Learning how to pack a bento box can transform your lunch routine from rushed and expensive to organized and delicious. I’ve packed thousands of bentos over the past five years for work, travel, and family outings, and I can tell you that anyone can master this skill with the right approach. In this guide, I’ll show you exactly how to pack a bento box that stays fresh, looks beautiful, and takes just 15 minutes to prepare.
Whether you’re packing lunch for school, work, or a weekend picnic, the principles remain the same. You’ll learn the golden ratios that ensure balanced nutrition, the step-by-step packing order that prevents sogginess, and the gap filler techniques that keep everything in place. By the end, you’ll have the confidence to create beautiful, tasty bentos that make lunchtime something to look forward to.
Table of Contents
What Is a Bento Box?
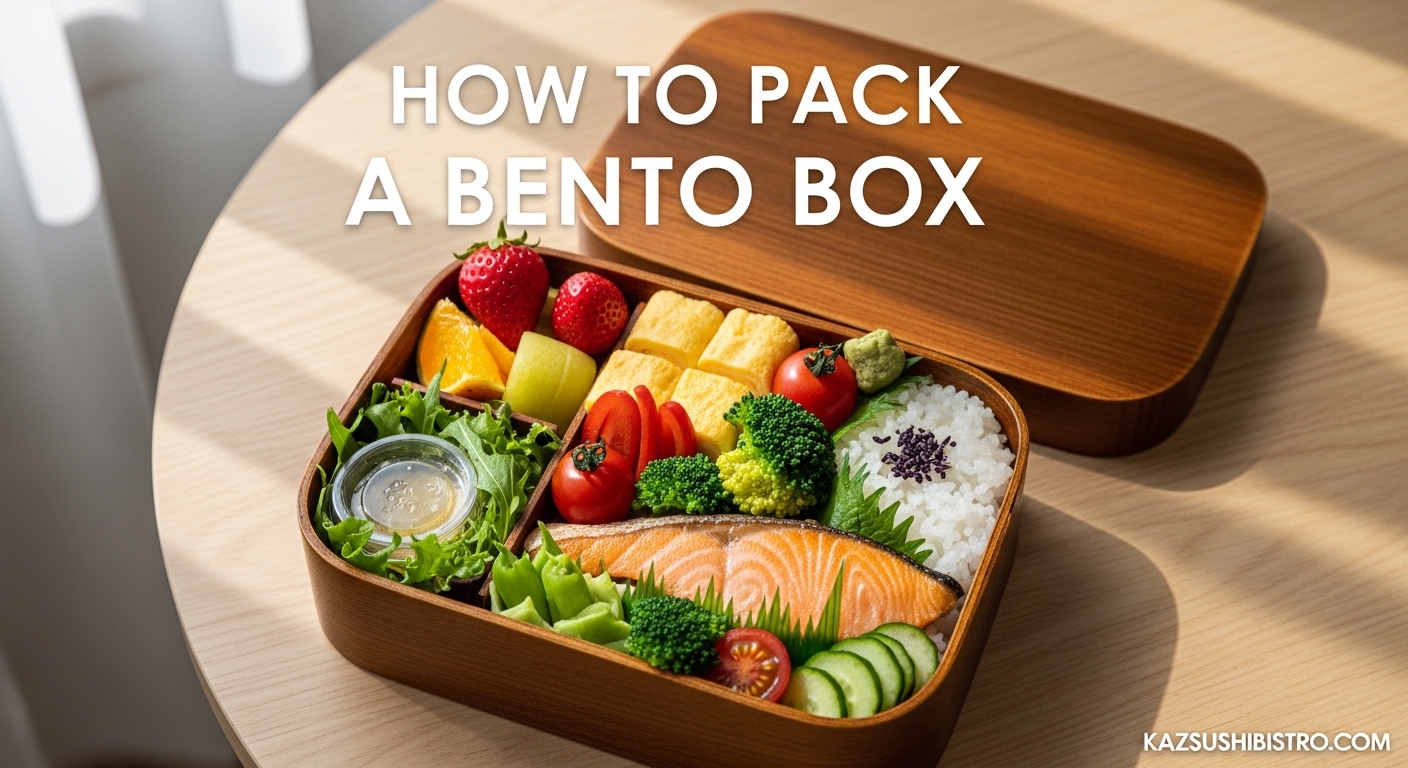
A bento box is a Japanese-style packed lunch traditionally served in a compartmentalized container. The word “bento” itself means “convenient” in Japanese, and that’s exactly what this meal system delivers: a complete, balanced meal in one portable package.
The traditional bento contains rice, protein, and vegetables arranged in a way that emphasizes both nutrition and visual appeal. Unlike typical Western lunch boxes where foods might get mixed together, bento containers keep each component separate and organized. This separation isn’t just about aesthetics; it helps maintain texture, temperature, and flavor integrity until you’re ready to eat.
People choose bento for many reasons. Portion control becomes effortless when you work within fixed compartments. You’ll save significant money compared to buying lunch daily, often $50-100 per month. The nutritional balance is built into the packing system itself. Plus, there’s something genuinely satisfying about opening a beautiful lunch that you prepared yourself.
The Golden Rules of Bento Packing 2026
Every successful bento follows one of two simple ratio systems. These ratios ensure nutritional balance while giving you flexibility to use whatever ingredients you have on hand.
The 4-3-2-1 Rule Explained
The 4-3-2-1 rule breaks your bento into four parts: 4 parts carbohydrates (rice, pasta, bread), 3 parts protein (meat, fish, eggs, tofu), 2 parts vegetables (cooked or raw), and 1 part fruit or dessert. This creates approximately 40% carbs, 30% protein, 20% vegetables, and 10% fruit.
This ratio works nutritionally because it mirrors what dietitians recommend: adequate energy from carbs, sufficient protein for satiety and muscle maintenance, plenty of vegetables for vitamins and fiber, and a small sweet treat for satisfaction. The 4-3-2-1 rule is the traditional Japanese approach and works particularly well for adult portions.
The 2:1:1 Ratio (Simplified Version)
For beginners or those who prefer simpler math, the 2:1:1 ratio divides your bento into halves and quarters. Fill half your container with carbohydrates, one quarter with protein, and one quarter with vegetables. This equals roughly 50% carbs, 25% protein, and 25% vegetables.
Many people find this ratio easier to visualize when packing. It also naturally creates more vegetable space, which works well for those trying to increase their produce intake. You can add fruit as an extra outside the ratio or include it within the vegetable portion.
Why These Ratios Matter
These aren’t arbitrary numbers. They reflect decades of nutritional science and cultural wisdom about what makes a satisfying, energizing meal. The carbohydrate base provides steady energy. The protein prevents the mid-afternoon slump. The vegetables add volume and nutrients without excessive calories.
When I started packing bento using the 2:1:1 ratio, I noticed I wasn’t hitting the vending machine at 3 PM anymore. The balanced macronutrients kept my blood sugar stable through the afternoon. This is why bento packing isn’t just about cute lunches; it’s a practical system for eating well.
What Goes in a Bento Box?
A well-packed bento includes five main categories of food. Understanding these categories helps you mix and match based on what you have available while maintaining that crucial balance.
The Foundation: Starches and Carbs
Your carbohydrate base anchors the meal. White rice is traditional, but brown rice, quinoa, pasta, soba noodles, bread rolls, or potato salad work equally well. The key is choosing something that holds up well at room temperature.
If using rice, consider mixing in furikake (Japanese rice seasoning) for flavor. For pasta, choose shapes that won’t stick together like fusilli or penne. When using bread, toasted versions resist sogginess better than soft bread.
The Protein Power
Protein options for bento are nearly endless. Karaage (Japanese fried chicken) stays crispy even when cold. Tamagoyaki (Japanese rolled omelet) is a bento classic. Grilled fish, meatballs, sausages, hard-boiled eggs, and tofu preparations like gomaae (sesame-dressed greens with tofu) all work beautifully.
The protein should be cooked and seasoned before packing. Cold chicken marinated in teriyaki sauce tastes better at lunch than plain grilled chicken. Consider how flavors will develop as the food cools; this is why many Japanese bento proteins are seasoned more boldly than typical Western lunches.
Vegetables and Side Dishes
Vegetables add color, texture, and nutrition. Blanched broccoli, carrot sticks, cucumber slices, cherry tomatoes, and sautéed spinach are common choices. Japanese side dishes like kinpira renkon (braised lotus root), hijiki salad (simmered seaweed with vegetables), and gomaae (vegetables with sesame dressing) add variety.
The key with vegetables is preparation. Raw vegetables should be sturdy. Blanched vegetables should be cooled completely and patted dry to prevent sogginess. Pickled vegetables are excellent because they actually improve in flavor over several hours.
Fruits and Small Treats
Fruit provides natural sweetness and a refreshing finish to your meal. Choose fruits that don’t brown easily: grapes, berries, oranges, melons, and cherries work well. Apples and pears can work if tossed with a little lemon juice.
Many bento include a small sweet treat: a few squares of chocolate, a small cookie, or traditional Japanese wagashi. This isn’t about dessert; it’s about ending the meal with satisfaction.
Foods to Avoid in Bento
Some foods simply don’t work well in packed lunches. Mayonnaise-based salads can spoil quickly at room temperature. Delicate greens like lettuce wilt and become slimy. Crispy foods like tempura go soggy unless packed in special vented containers. Very juicy fruits can leak and make other foods mushy.
Highly perishable items like raw fish (sashimi), rare meats, and unpasteurized dairy should never be included unless you’re using a thermal jar with ice packs. When in doubt, choose foods that taste good cold or at room temperature.
How to Pack a Bento Box: Step-by-Step 2026
Packing order matters more than you might think. The right sequence prevents crushing, controls moisture, and ensures your bento looks as good at lunchtime as it did when you packed it.
Key Packing Steps
Follow these steps every time you pack a bento:
Step 1: Pack bulky items first. Your main dish or largest component goes in first. This is usually your protein or main carbohydrate. Place it in the largest compartment or section of your container.
Step 2: Add your side dishes. Place smaller items around the main dish. This might include your vegetables, a small portion of rice, or secondary proteins.
Step 3: Fill gaps with small items. Use cherry tomatoes, grapes, pickles, or silicone cups filled with small portions to fill any empty spaces. This prevents food from shifting during transport.
Step 4: Cool completely before sealing. Leave the lid off until all food reaches room temperature. This is the most important step for preventing condensation and sogginess.
Step 5: Pack sauces and dressings separately. Use small containers or sauce bottles for anything wet. Add these to your lunch bag, not inside the bento box itself.
Morning vs. Night Before: When to Pack
The eternal question for bento packers is whether to pack the night before or in the morning. Both approaches work, but they require different techniques.
Packing the night before saves precious morning time. If you choose this method, let all food cool completely before packing, then refrigerate the entire bento uncovered for the first hour to prevent condensation. Cover it only after it’s fully chilled. Never pack warm food and immediately refrigerate; this creates the perfect environment for bacteria growth and makes rice hard and unpleasant.
Packing in the morning gives you the freshest result. With proper meal prep done on weekends, morning packing takes just 10-15 minutes. Assemble pre-cooked components, add any fresh items, and you’re done. This is my preferred method for best texture and food safety.
Preventing Food from Shifting
There’s nothing sadder than opening your carefully packed bento at lunch to find everything jumbled together. The key to preventing this is packing tight with no empty spaces.
Every gap in your container is an opportunity for food to move. Fill these spaces with small, sturdy items. Cherry tomatoes, small pickles, cheese cubes, or silicone cups filled with items like edamame work perfectly. Think of it like a puzzle: you want every piece touching something else so nothing can slide around.
Gap Fillers: The Secret to Perfect Bento
Gap fillers are small food items used to fill empty spaces in your bento box. They serve two critical functions: they prevent food from shifting during transport, and they add visual appeal through color and variety.
Best Gap Filler Foods
The ideal gap filler is small, sturdy, and colorful. Cherry tomatoes are the classic choice; they’re round, resist crushing, and add a bright pop of red. Baby carrots, cucumber slices, radish roses, small pickles, grapes, berries, and nuts all work well.
Japanese bento often uses decorative picks with small items like meatballs, cheese cubes, or rolled ham slices. These add height and interest while filling awkward corners. Umeboshi (pickled plum) serves as both a gap filler and a palate cleanser.
Using Silicone Cups Effectively
Silicone baking cups (also called bento cups or muffin liners) are transformative for bento packing. They create compartments within compartments, allowing you to include items that might otherwise touch and affect each other.
Use small silicone cups for wet items like sauced vegetables or marinated proteins. Use larger ones for rice portions or mixed salads. The cups themselves add color and can be coordinated with your food for visual appeal. Best of all, they’re reusable and dishwasher safe.
Strategic Placement
Place your gap fillers last, after all main components are positioned. Look for empty corners, spaces between larger items, and any gaps along the edges. Pack them snugly but not so tight that they crush delicate foods.
Think about color balance when placing gap fillers. If your bento is looking brown and beige from fried chicken and rice, add red tomatoes, green grapes, or orange carrots to create visual interest. A colorful bento is more appetizing and signals nutritional variety.
Bento Food Safety: Keeping Your Lunch Fresh
Food safety is the foundation of good bento practice. Without proper safety measures, even the most beautiful bento becomes a health risk. Understanding temperature guidelines and timing is essential.
The Temperature Danger Zone
Bacteria multiply rapidly between 40°F and 140°F (4°C and 60°C). This is called the temperature danger zone. Food left in this range for more than two hours becomes unsafe to eat. In hot weather above 90°F (32°C), that window shrinks to just one hour.
A properly packed bento stays safe for approximately 4-6 hours at room temperature if it started completely cooled. However, this assumes the food wasn’t in the danger zone for extended periods before packing. Always start with properly cooled food to maximize safe eating time.
Cooling Completely Before Sealing
The most important food safety rule for bento is also the most commonly broken. You must let all cooked food cool to room temperature before sealing the container. This prevents condensation, which makes food soggy and creates a moist environment where bacteria thrive.
After cooking, spread food on a plate or cooling rack for 15-20 minutes. If you’re in a hurry, a small fan can speed cooling. Test with your hand; the food should feel neither warm nor hot. Rice should feel completely cool to the touch before packing.
Preventing Condensation and Sogginess
Condensation is the enemy of good bento texture. When warm food meets a closed container, moisture condenses on the lid and drips back onto your food. This makes rice gummy, vegetables soggy, and fried foods lose their crispness.
Pack your bento with the lid off until the last minute. If you must seal it while still slightly warm, place a paper towel or food-safe desiccant packet under the lid to absorb moisture. Remove the towel before eating. For fried items like karaage, use a vented container or wrap loosely in parchment paper rather than sealing airtight.
Hot Food Solutions: Thermal Jars
If you want to pack hot food like soup, curry, or freshly cooked rice, use a thermal lunch jar. These insulated containers keep food hot for hours through vacuum insulation technology.
Pre-heat your thermal jar for best results. Pour boiling water into the container, seal, and let sit for 5 minutes. Dump the water, quickly add your hot food, and seal immediately. This priming prevents the container from absorbing heat from your food. Pre-heating extends safe eating temperature by 2-3 hours.
Ice Packs and Insulated Bags
For hot weather or highly perishable items, use an ice pack and insulated lunch bag. Place a small ice pack on top of your bento (cold air sinks), or use a dedicated bento cooler bag with built-in insulation.
Remember that ice packs work best when the food starts cold. Don’t expect an ice pack to cool warm food to safe temperatures; it only maintains existing coldness. If you’re including something like yogurt or hard-boiled eggs in summer, this extra cooling step is essential.
Meal Prep Tips for Easy Morning Packing
The secret to stress-free morning bento packing is weekend preparation. Spending two hours on Sunday prepping components transforms weekday mornings from frantic to smooth.
Sunday Prep Strategies
Choose two or three proteins to prepare in bulk. Karaage freezes beautifully and can be reheated from frozen in the morning. Meatballs simmered in teriyaki sauce last all week. Tamagoyaki keeps for 3-4 days refrigerated. Hard-boil a half dozen eggs. These become your building blocks.
Prepare vegetables in batches too. Blanched broccoli, seasoned spinach, and carrot kinpira all keep for 5-6 days when properly stored. Wash and portion fruits like grapes and berries into small containers. Having everything washed, cut, and ready to grab makes morning assembly fast.
Freezer-Friendly Bento Staples
Your freezer is a bento packer’s best friend. Many traditional bento items freeze and reheat surprisingly well. Frozen rice portions wrapped in plastic wrap can be microwaved in 2 minutes. Pre-formed onigiri (rice balls) freeze for up to a month.
Gyoza (dumplings), croquettes, and many fried foods can be cooked from frozen in the morning. Keep a bag of frozen edamame for instant protein and vegetable in one. Pre-portioned frozen vegetables steam quickly and can be seasoned while hot. The forum users I’ve learned from swear by frozen gyoza as their emergency bento savior.
The 15-Minute Morning Timeline
With proper prep, here’s how morning packing breaks down: 3 minutes to microwave rice or your frozen staple. While that heats, 5 minutes to arrange pre-prepped proteins and vegetables in your bento. 2 minutes to wash and add fresh fruit or vegetables. 3 minutes to fill gaps and add final touches. 2 minutes to cool slightly before sealing and packing your bag.
The key is moving efficiently without rushing. Start the rice first since it takes longest. While it microwaves, do everything else. By the time you’re done arranging, the rice is hot and ready to add last. Let it cool while you gather your bag, utensils, and drink.
Common Bento Packing Mistakes to Avoid
Even experienced bento packers make mistakes. Learning from these common errors will save you from disappointing lunches and help you develop good habits from the start.
Packing Hot Food
The number one mistake is packing food while it’s still warm. This creates condensation that ruins texture and promotes bacterial growth. Always cool to room temperature before sealing. If you’re rushed, at least let food cool for 10 minutes uncovered before packing.
Refrigerating Rice Overnight
Rice becomes hard and unpleasant when refrigerated overnight without proper wrapping. If you must prep rice the night before, wrap individual portions tightly in plastic wrap while the rice is still warm. The trapped steam keeps the rice moist. Never refrigerate unwrapped rice in the bento box itself.
Forgetting Gap Fillers
Skipping gap fillers leads to jumbled, unappetizing lunches. That empty space will be filled with shifting food by noon. Always scan your packed bento for gaps before sealing. Keep a container of cherry tomatoes or grapes handy for quick gap filling.
Mixing Wet and Dry Ingredients
Sauces, dressings, and juicy items should never touch dry foods directly. Use silicone cups, small sauce containers, or separate compartments to maintain separation. Even a small amount of moisture can make crackers soggy or rice gummy within hours.
Overpacking the Box
Trying to cram too much food leads to crushed items and difficulty closing the lid. Bento portions are naturally smaller than typical Western lunches; this is part of the portion control benefit. If your food is mounding above the rim, remove some items or choose a larger container.
Ignoring Food Safety Timeframes
Packing a bento at 7 AM and leaving it in a hot car until 1 PM is asking for trouble. In summer heat, use an insulated bag with ice packs. In winter, you have more leeway. Know your conditions and adjust accordingly. When in doubt, include an ice pack or choose less perishable items.
Three Real Bento Examples You Can Pack Today
Theory is helpful, but seeing real examples makes bento packing concrete. Here are three complete bentos with full breakdowns that you can recreate exactly or adapt based on what you have available.
Example 1: Classic Japanese Bento
This is the traditional bento that comes to mind when most people think of Japanese lunch boxes. It follows the 2:1:1 ratio perfectly.
Components: White rice mixed with furikake (about 1.5 cups), three pieces of karaage (Japanese fried chicken), two slices of tamagoyaki (rolled omelet), four stalks of blanched broccoli, a small portion of hijiki salad (simmered seaweed with carrots), two umeboshi (pickled plums) as gap fillers, and six grapes.
Packing order: Place the rice in one large silicone cup or the biggest compartment. Arrange the karaage and tamagoyaki beside it. Add hijiki salad in a small cup. Fill gaps with broccoli, umeboshi, and grapes. This bento provides approximately 550 calories with balanced macros and beautiful color variety.
Example 2: Quick Western-Style Bento
For those who prefer familiar flavors, this Western-inspired bento uses the same packing principles with different ingredients.
Components: Quinoa and roasted vegetable mix (about 1.5 cups), two turkey and cheese roll-ups, half a hard-boiled egg, carrot sticks and cherry tomatoes with a small container of ranch dressing on the side, a handful of almonds, and a few strawberries.
Packing order: Pack the quinoa mix first as your largest item. Arrange turkey roll-ups in a separate section. Place the egg half in a silicone cup to prevent it from sliding. Fill gaps with carrot sticks, cherry tomatoes, and almonds. Pack dressing separately. Add strawberries last in any remaining space. This bento comes together in under 15 minutes using mostly pre-prepped components.
Example 3: Vegetarian Bento
This meat-free option is protein-rich and colorful, proving that vegetarian bento can be just as satisfying.
Components: Brown rice with gomashio (sesame salt), two pieces of agedashi tofu (fried tofu in dashi), half an avocado sliced, cucumber and cherry tomato salad, edamame in pods, pickled ginger, and orange segments.
Packing order: Start with the rice portion. Place the agedashi tofu beside it, using a small cup if there’s any remaining sauce. Add edamame in its own section. Fill gaps with cucumber-tomato salad and pickled ginger. Tuck avocado slices carefully to prevent bruising, or wrap them in plastic wrap if your container is crowded. Add orange segments last. The variety of proteins (tofu, edamame) makes this surprisingly filling.
Frequently Asked Questions
What is the 4 3 2 1 bento rule?
The 4-3-2-1 bento rule is a portion guideline that divides your bento into four parts: 4 parts carbohydrates (40%), 3 parts protein (30%), 2 parts vegetables (20%), and 1 part fruit or dessert (10%). This creates a nutritionally balanced meal with adequate energy from carbs, protein for satiety, vegetables for vitamins, and a small sweet treat.
What is the bento box rule?
The bento box rule refers to the fundamental principle that everything packed must be cooled to room temperature before sealing the container. This prevents condensation, maintains food texture, and ensures food safety. Additionally, bento should be packed tightly with no empty spaces to prevent food from shifting during transport.
What is the best way to pack a bento box?
The best way to pack a bento box is: 1) Pack bulky items first (main dish), 2) Add side dishes around them, 3) Fill gaps with small items like cherry tomatoes or grapes to prevent shifting, 4) Let everything cool completely before sealing, and 5) Pack sauces separately. Pack in the morning for best freshness, or the night before if you cool completely and refrigerate properly.
What are some common bento box mistakes?
Common bento mistakes include: packing food while still warm (causes condensation and sogginess), refrigerating rice overnight without wrapping (makes it hard), forgetting gap fillers (food shifts and looks messy), mixing wet and dry ingredients directly (creates sogginess), overpacking the box (crushes food), and ignoring food safety timeframes (leaving perishable food in heat too long).
What are good foods to put in a bento box?
Good bento foods include: starches like rice, pasta, or bread; proteins like karaage (fried chicken), tamagoyaki (rolled omelet), meatballs, or hard-boiled eggs; vegetables like blanched broccoli, cherry tomatoes, or carrot sticks; and fruits like grapes or oranges. Foods that taste good cold or at room temperature work best. Avoid mayonnaise-based salads, delicate greens, and highly perishable items unless using proper cooling.
Can you pack bento the night before?
Yes, you can pack bento the night before, but proper cooling is essential. Let all food cool to room temperature before packing, then refrigerate uncovered for the first hour to prevent condensation. Cover only after fully chilled. Rice should be wrapped tightly in plastic wrap while still warm if made ahead. Pack any fresh items like fruit in the morning for best quality.
Start Your Bento Journey Today
You now have everything you need to pack beautiful, delicious, and safe bento lunches. The key principles are simple: follow the ratios for balance, pack bulky items first, fill every gap, cool completely before sealing, and always keep food safety in mind.
Don’t worry about making perfect bento right away. My first attempts were messy and took forever. With practice, the 15-minute morning routine becomes automatic. Start with simple combinations, master the cooling rule, and gradually expand your repertoire.
Learning how to pack a bento box isn’t just about lunch; it’s about taking control of your midday meal, saving money, eating better, and finding joy in a small daily ritual. Your bento box is waiting. Happy packing!