Learning how to make katsu curry at home brings one of Japan’s most beloved comfort foods straight to your kitchen. This satisfying dish combines a crispy, golden breaded cutlet with rich, savory curry sauce over a bed of fluffy rice. I spent months perfecting this recipe, testing different roux brands, and learning the timing secrets that make restaurant-quality katsu curry achievable in your own home.
The story of katsu curry begins in 1948 at a small restaurant called Grill Swiss in Tokyo’s Ginza district. A clever chef decided to place a breaded pork cutlet on top of Japanese curry rice, creating a hybrid dish that would become a national favorite. Today, I’ll walk you through every step of making authentic katsu curry, from choosing the right curry roux to achieving that perfect crispy coating on your cutlet.
Table of Contents
What Is Katsu Curry?
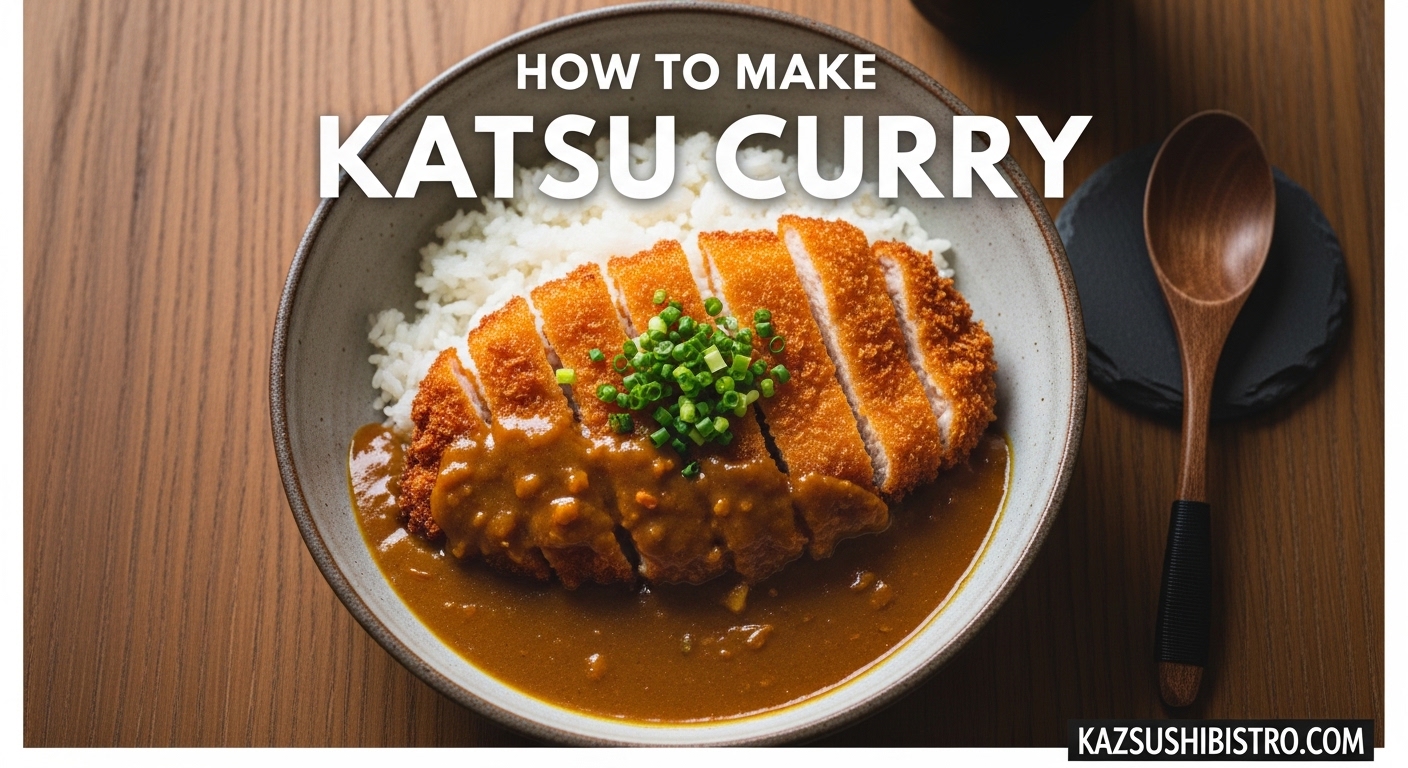
Katsu curry is a Japanese yoshoku dish consisting of three essential components: thick Japanese curry sauce, a breaded and deep-fried cutlet called katsu, and steamed short-grain rice. The word “katsu” comes from the English “cutlet,” while the curry component represents Japan’s unique adaptation of Indian curry through British influence.
Unlike Indian or Thai curries, Japanese curry features a thick, smooth, gravy-like consistency and milder flavor profile. The sauce is typically made with a curry roux that includes flour, fat, and a blend of spices including turmeric, cumin, coriander, and fenugreek. This roux thickens the sauce into a rich, velvety blanket that coats the rice and cutlet perfectly.
The katsu itself refers to a panko-breaded cutlet, traditionally made from pork (tonkatsu) or chicken (chicken katsu). The cutlet is pounded thin, dredged in flour, dipped in egg wash, coated in coarse Japanese breadcrumbs called panko, then deep-fried until golden and crispy. When sliced and placed atop the curry-covered rice, it creates a textural contrast that makes every bite exciting.
This dish gained popularity because it combines two of Japan’s favorite Western-influenced foods into one hearty meal. The warmth of the curry, the crunch of the katsu, and the comforting rice base make it a staple in Japanese homes and restaurants alike. It is often served with fukujinzuke, a sweet and tangy pickled vegetable condiment that cuts through the richness of the dish.
Ingredients You’ll Need 2026
Making katsu curry requires two distinct sets of ingredients: one for the curry sauce and another for the breaded cutlet. You will also need accompaniments that complete the traditional presentation. I have organized everything below so you can shop efficiently and avoid mid-cooking store runs.
For the Curry Sauce
The curry sauce starts with aromatics that build the flavor foundation. You will need one large onion, two cloves of garlic, and a one-inch piece of fresh ginger. Some cooks also add a grated apple or a touch of honey to enhance the natural sweetness and depth of the sauce.
For the body of the curry, gather two medium carrots, two medium potatoes, and about one pound of protein if you want meat in the curry itself. Traditional choices include chicken thighs or beef chunks, though many home cooks skip the meat in the curry since the katsu provides plenty of protein.
The curry roux is the heart of the sauce. You have two options: store-bought curry roux blocks or homemade roux made from butter, flour, and curry spices. Store-bought blocks are the standard in Japanese households and come in several varieties. House Vermont Curry offers a mild, slightly sweet flavor that is perfect for beginners. Golden Curry provides a more traditional, robust taste. S&B curry roux tends to be spicier and more aromatic.
If making roux from scratch, you will need unsalted butter, all-purpose flour, and Japanese curry powder (S&B or House Foods brands work well). Adding a teaspoon of unsweetened cocoa powder and a pinch of garam masala creates a deeper, more complex flavor reminiscent of restaurant curries.
For the Katsu
Choose your protein first. Boneless pork loin chops work beautifully for tonkatsu, while boneless, skinless chicken thighs or breasts make excellent chicken katsu. I recommend pork for its juiciness and flavor, but chicken is easier to work with and slightly healthier. You will need about six to eight ounces of meat per person.
The breading station requires three components. Set out all-purpose flour seasoned with salt and pepper, beaten eggs (one egg per two cutlets usually suffices), and panko breadcrumbs. Panko is crucial for that signature crispy, airy coating. Do not substitute regular breadcrumbs, as they create a denser, less crunchy crust.
You will also need vegetable oil for frying. A neutral oil with a high smoke point works best. Canola, peanut, or vegetable oil all perform well. You need enough oil to submerge the cutlets halfway, typically about two cups for a standard home skillet.
For Serving
The rice is not an afterthought in katsu curry. Japanese short-grain rice provides the ideal sticky, clumpy texture that holds the sauce beautifully. Plan for about one cup of cooked rice per serving. You will also want fukujinzuke, the red pickled vegetables traditionally served alongside curry. Look for this in the Japanese section of well-stocked grocery stores or Asian markets.
Optional garnishes include toasted sesame seeds, thinly sliced green onions, or a drizzle of Japanese mayonnaise. Some people enjoy a splash of soy sauce or tonkatsu sauce on their cutlet before adding the curry.
How to Make the Curry Sauce?
The curry sauce requires patience and time, so start this component first. A good curry needs at least 30 minutes of simmering to develop its full flavor and properly thicken. I recommend beginning the curry about 45 minutes before you plan to fry the katsu.
Step 1: Prepare the Aromatics
Finely dice one large onion. Grate two cloves of garlic and a one-inch piece of ginger. Some cooks swear by grating the onion as well, which releases more juices and helps the aromatics caramelize faster. This technique, learned from restaurant chefs, cuts cooking time without sacrificing flavor.
Step 2: Sauté Until Golden
Heat two tablespoons of oil in a large pot or deep skillet over medium heat. Add the onions and cook, stirring occasionally, for about 10 minutes until they turn soft and golden. The caramelization of the onions creates the sweet, rich base that distinguishes great curry from mediocre curry.
Here is a professional tip I discovered through extensive testing. Add an eighth of a teaspoon of baking soda to the onions. This raises the pH and speeds up the Maillard reaction, reducing caramelization time by half while developing even deeper flavor.
Step 3: Add Garlic, Ginger, and Vegetables
Once the onions are golden, add the grated garlic and ginger. Cook for one minute until fragrant. Add diced carrots and potatoes, stirring to coat them in the aromatic oil. Cook for three to four minutes to slightly soften the vegetables and infuse them with flavor.
If you are adding meat to the curry, add it now and brown it on all sides. Chicken thighs or beef chunks work best. Skip this step if you are relying solely on the katsu for protein.
Step 4: Add Liquid and Simmer
Pour in four cups of water or chicken stock. Bring to a boil, then reduce heat to low. Cover and simmer for 20 to 25 minutes until the vegetables are tender and easily pierced with a fork. The liquid will reduce slightly during this process.
While the curry simmers, you may notice a foam rising to the surface. Skim this off with a ladle for a cleaner-tasting final sauce. Some cooks also add a small piece of kombu (dried kelp) during simmering for extra umami depth.
Step 5: Incorporate the Roux
Turn off the heat completely before adding the roux. This prevents clumping and ensures smooth incorporation. If using store-bought roux blocks, break them into small pieces and stir into the hot liquid until completely dissolved.
If using homemade roux, you should have prepared it separately by cooking equal parts butter and flour with curry spices until golden. Whisk this paste into the curry off the heat, then return to low heat and stir constantly until thickened.
For an extra layer of depth, stir in one teaspoon of unsweetened cocoa powder and a quarter teaspoon of garam masala at this stage. These secret ingredients add complexity without making the curry taste chocolatey or overwhelmingly spiced.
Step 6: Final Simmer and Seasoning
Return the heat to low and simmer uncovered for 10 minutes, stirring occasionally. The sauce should thicken to a gravy-like consistency that coats the back of a spoon. If it seems too thick, add water a quarter cup at a time. If too thin, simmer longer or add more roux.
Taste and adjust seasoning. Some roux brands are saltier than others. You may need to add soy sauce, salt, or even a touch of honey to balance the flavors. Keep the curry warm on the lowest heat setting while you prepare the katsu.
How to Make the Katsu?
The katsu demands your full attention, which is why we prepared the curry first. Frying requires precise temperature control and timing. Once you start breading, you should move quickly and efficiently to the frying stage.
Step 1: Prepare the Meat
If using pork, choose boneless loin chops about three-quarters to one inch thick. For chicken, boneless thighs offer more flavor than breasts, but both work well. Place the meat between two sheets of plastic wrap or parchment paper.
Pound the meat gently with a meat mallet or rolling pin to an even half-inch thickness. Even thickness ensures uniform cooking. The thinness also creates the ideal ratio of crispy coating to tender meat that makes katsu so satisfying.
Season both sides of the meat lightly with salt and pepper. Some cooks skip this step because the curry sauce provides plenty of seasoning, but I find a light salting enhances the meat’s natural flavor.
Step 2: Set Up the Breading Station
Arrange three shallow dishes in a row. In the first, place half a cup of all-purpose flour seasoned with a quarter teaspoon each of salt and pepper. In the second, beat two large eggs with one tablespoon of water. In the third, pour two cups of panko breadcrumbs.
Keep one hand for dry ingredients and one for wet to avoid breaded fingers. This technique, while it takes practice, makes the process much cleaner and faster.
Step 3: Dredge in Flour
Dredge each piece of meat in the seasoned flour, shaking off any excess. The flour layer should be thin and even. It provides the foundation that helps the egg wash adhere properly.
Pay special attention to the edges and corners of the meat. Uneven dredging leads to patchy breading that can separate during frying. Let the floured cutlets rest on a plate for five minutes before proceeding to the egg stage.
Step 4: Coat in Egg Wash
Dip the floured cutlet into the beaten egg, turning to coat completely. Let excess egg drip off before moving to the panko. A thick egg layer creates a gummy coating underneath the crisp panko.
The egg acts as the glue that binds the panko to the meat. Without proper egg coverage, the breadcrumbs will fall off during frying, leaving bare spots on your finished katsu.
Step 5: Press into Panko
Press the egg-coated cutlet firmly into the panko breadcrumbs. Turn and press again, ensuring complete coverage. The breadcrumbs should adhere in a thick, even layer. Gently pat any loose areas to secure the coating.
For extra crispy katsu, press the panko firmly and create a thick coating. Some Japanese restaurants double-coat their katsu by repeating the egg and panko steps, creating an almost armor-like crust.
Place the breaded cutlets on a wire rack or plate and let them rest for 10 minutes. This resting period allows the coating to set and adhere better during frying.
Step 6: Heat the Oil
Pour vegetable oil into a heavy skillet or Dutch oven to a depth of about one inch. Heat the oil to 350 degrees Fahrenheit (175 degrees Celsius). Use a candy thermometer to monitor the temperature precisely.
The oil temperature is critical. Too cold, and the katsu absorbs oil and becomes greasy. Too hot, and the outside burns before the inside cooks through. Maintain the temperature between 340 and 360 degrees throughout frying.
Step 7: Fry the Cutlets
Carefully lower one or two cutlets into the hot oil, depending on your pan size. Do not crowd the pan, as this drops the oil temperature and creates soggy katsu. Fry for about three to four minutes per side until golden brown.
The katsu should sizzle vigorously when it hits the oil. If it does not, the oil is not hot enough. Listen for the sound; proper frying creates an immediate, energetic sizzle.
Turn the cutlets carefully with tongs to ensure even browning. The finished katsu should be deep golden brown and sound hollow when tapped lightly.
Step 8: Drain and Rest
Remove the fried katsu to a wire rack set over a baking sheet. Letting them drain on a rack rather than paper towels keeps the bottom crust crispy. Paper towels trap steam and soften the underside.
Let the katsu rest for at least three minutes before slicing. This resting period allows the juices to redistribute throughout the meat. Cut too early, and the juices run out, leaving dry meat.
When slicing, use a sharp knife and cut with a firm, decisive motion. Sawing back and forth tears the breading. Cut the katsu into strips about one inch wide, keeping the slices intact rather than separating them completely.
How to Assemble and Serve?
Timing is everything in the final assembly. The katsu should be freshly fried and hot, while the curry needs to be warm and ready to pour. I recommend having all components within arm’s reach before you begin plating.
Step 1: Prepare the Rice
Scoop about one cup of hot, freshly cooked Japanese short-grain rice into a shallow bowl or plate. Mound the rice slightly off-center, creating space for the katsu and curry. The rice should be steaming hot.
If you have a rice cooker, time it to finish just as the katsu comes out of the fryer. Cold rice ruins the experience, so reheat if necessary before plating.
Step 2: Position the Katsu
Lay the sliced katsu strips over the rice, slightly overlapping them. Arrange the cutlets so the golden, crispy side faces upward and outward. The presentation matters; you want to showcase that beautiful breading.
Some restaurants place the katsu beside the rice rather than on top, which keeps the breading crisper longer. Either approach works; choose based on your preference for presentation versus texture.
Step 3: Ladle the Curry
Pour the hot curry sauce alongside and partially over the katsu and rice. Use a large ladle and pour slowly to control the amount. You want enough sauce to coat the rice generously without completely submerging the cutlet.
The ideal ratio is about one-third of the plate for rice, one-third for katsu, and one-third covered in curry sauce. This balance ensures every bite contains all three components.
Step 4: Add Traditional Accompaniments
Place a small mound of fukujinzuke on the side of the plate or in a small separate dish. This pickled condiment provides a sweet-tart contrast that cuts through the richness of the fried cutlet and heavy curry.
Sprinkle toasted sesame seeds over the curry for added nuttiness and visual appeal. Thinly sliced green onions also make an excellent garnish, adding fresh color and a mild onion bite.
Serve immediately while everything is hot. Katsu curry waits for no one; the cutlet softens quickly once covered in sauce, so encourage diners to start eating right away.
Tips, Variations, and Troubleshooting
After making katsu curry dozens of times, I have encountered nearly every problem and discovered solutions that save dinner. This section covers the most common issues and variations to help you adapt the recipe to your needs.
Troubleshooting Common Problems
Curry Too Thin: If your curry lacks body, mix one tablespoon of cornstarch with two tablespoons of cold water to create a slurry. Stir this into the simmering curry and cook for two more minutes. Alternatively, add more curry roux and simmer until thickened.
Curry Too Thick: Thin overly thick curry by whisking in hot water or stock, a quarter cup at a time, until you reach the desired consistency. Remember that curry thickens as it cools, so aim for slightly thinner than your target when hot.
Katsu Not Crispy: Soggy katsu usually results from oil that was not hot enough, overcrowding the pan, or insufficient resting on a wire rack. Make sure your oil reaches 350 degrees before frying, fry in batches, and always drain on a rack rather than paper towels.
Breading Falls Off: If the panko separates from the meat during frying, you likely skipped the flour dredge or did not let the breaded cutlets rest before frying. The flour provides the grip that holds everything together.
Pro Tips for Restaurant-Quality Results
Add a teaspoon of baking soda when caramelizing the onions. This simple trick, borrowed from professional kitchens, reduces cooking time by half while developing deeper flavor through accelerated Maillard reactions.
For extra depth in your curry, incorporate one teaspoon of unsweetened cocoa powder and a quarter teaspoon of instant coffee powder when adding the roux. These ingredients add complexity and color without making the curry taste like chocolate or coffee.
Thin-cut katsu actually works better for this dish than thick-cut. Restaurants often use cutlets pounded to a quarter-inch thickness because they cook faster, stay juicier, and provide the ideal coating-to-meat ratio. The thin cutlet also slices more elegantly.
Make-Ahead and Storage Tips
Japanese curry improves overnight as the flavors meld. You can make the curry sauce up to three days ahead and reheat it gently before serving. Store it in an airtight container in the refrigerator.
The katsu, however, should always be fried fresh. Breaded cutlets can be frozen before frying for up to one month. Freeze them on a baking sheet, then transfer to a freezer bag. Fry directly from frozen, adding two extra minutes to the cooking time.
Leftover curry makes an excellent base for curry udon or curry soba noodles. Thin it slightly with dashi or water, heat, and pour over cooked noodles for a completely different meal.
Delicious Variations
Protein Swaps: Try beef katsu using thinly sliced beef pounded and breaded, or make tofu katsu using firm tofu pressed and sliced. Both offer interesting twists on the classic.
Vegetarian Option: Omit the meat entirely and add extra vegetables to the curry. Eggplant, sweet potato, and mushrooms work beautifully. Bread and fry thick slices of eggplant for a vegetarian “katsu” that satisfies.
Spice Level Adjustments: Most store-bought roux comes in mild, medium, and hot varieties. Start with mild if serving children or spice-sensitive guests. Add cayenne pepper or hot sauce for extra heat.
Baked Katsu: For a lighter option, spray breaded cutlets with cooking spray and bake at 425 degrees Fahrenheit for 20 minutes, flipping halfway. The result will not be as crispy as fried, but significantly healthier.
Frequently Asked Questions
How to make homemade katsu curry?
Making homemade katsu curry involves three main steps: preparing the curry sauce by caramelizing onions and aromatics, simmering vegetables with curry roux until thick; breading and frying your choice of cutlet using flour, egg, and panko breadcrumbs; and assembling by placing steamed rice in a bowl, topping with sliced katsu, and ladling curry sauce over everything. Start the curry first as it needs 30-45 minutes of simmering, then fry the katsu just before serving.
What is katsu curry sauce made of?
Katsu curry sauce is made from a base of caramelized onions, garlic, and ginger cooked with vegetables like carrots and potatoes. The sauce is thickened and flavored with curry roux, which contains flour, fat, and a blend of spices including turmeric, cumin, coriander, and fenugreek. Store-bought Japanese curry roux blocks from brands like House Vermont, Golden Curry, or S&B are most commonly used, though you can make roux from scratch with butter, flour, and curry powder.
Can I make katsu curry ahead of time?
You can make the curry sauce up to three days ahead and store it in the refrigerator. The flavors actually improve overnight. However, the katsu should be fried fresh just before serving for optimal crispiness. You can bread the cutlets ahead of time and refrigerate them for up to four hours before frying, or freeze breaded cutlets for up to one month and fry directly from frozen.
What is the difference between chicken katsu and pork katsu?
Chicken katsu uses boneless, skinless chicken thighs or breasts, resulting in a lighter flavor and slightly leaner dish. Pork katsu (tonkatsu) uses boneless loin chops, offering richer flavor, more juiciness, and a more traditional taste. Pork is the original protein used in katsu curry since its invention in 1948, but chicken has become equally popular, especially for those who prefer white meat or avoid pork.
Which curry roux brand is best for katsu curry?
House Vermont Curry is the best choice for beginners and families, offering a mild, slightly sweet flavor that appeals to most palates. Golden Curry provides a more traditional, savory flavor profile and comes in various spice levels. S&B curry roux tends to be more aromatic and spicier, favored by those who enjoy bold flavors. All three brands produce excellent results; choose based on your preferred spice level and whether children will be eating the dish.
Why is my katsu not crispy?
Soggy katsu usually results from oil that is not hot enough (should be 350°F/175°C), overcrowding the pan which drops the temperature, or draining on paper towels instead of a wire rack. Ensure your oil reaches the proper temperature before frying, cook in batches without crowding, and always drain fried cutlets on a wire rack to allow steam to escape. Fry the katsu immediately before serving, as the coating softens over time.
How do I fix curry that is too thin or too thick?
For curry that is too thin, create a slurry by mixing one tablespoon of cornstarch with two tablespoons of cold water, then stir it into the simmering curry and cook for two minutes. Alternatively, add more curry roux and simmer until thickened. For curry that is too thick, gradually whisk in hot water or stock, a quarter cup at a time, until you reach the desired consistency. Remember that curry thickens as it cools.
Conclusion
Learning how to make katsu curry at home opens up a world of Japanese comfort food that rivals any restaurant version. With practice, you will master the timing between simmering curry and frying cutlets, achieving that perfect balance of crispy, juicy, and rich that makes this dish so beloved.
Remember that great katsu curry is about more than following a recipe. It is about understanding how the caramelized onions build sweetness, how the roux creates that velvety sauce, and how the hot oil transforms panko into a golden armor around tender meat. Start with quality curry roux, take your time with the aromatics, and fry with confidence.
I encourage you to gather your ingredients this weekend and give this recipe a try. Your kitchen will fill with the warm, inviting aroma of Japanese curry, and your table will feature a meal that brings genuine joy. Whether you choose pork or chicken, mild or spicy roux, you are now equipped to make katsu curry that would make the original Grill Swiss chef proud.