That viral video of a tall, jiggly cheesecake dancing on a plate? I spent three months trying to recreate it in my home kitchen. If you have ever wondered how to make Japanese cheesecake that actually rises tall and creates that cloud-like texture, this guide contains everything I learned from countless collapsed attempts and finally nailing the technique.
Japanese cheesecake goes by many names. Some call it cotton cheesecake for its airy texture. Others refer to it as soufflé cheesecake because of the French technique behind it. In Japan, you might hear it called jiggly cheesecake for the way it trembles when warm. All these names describe the same magical dessert that sits somewhere between a traditional New York cheesecake and a delicate soufflé.
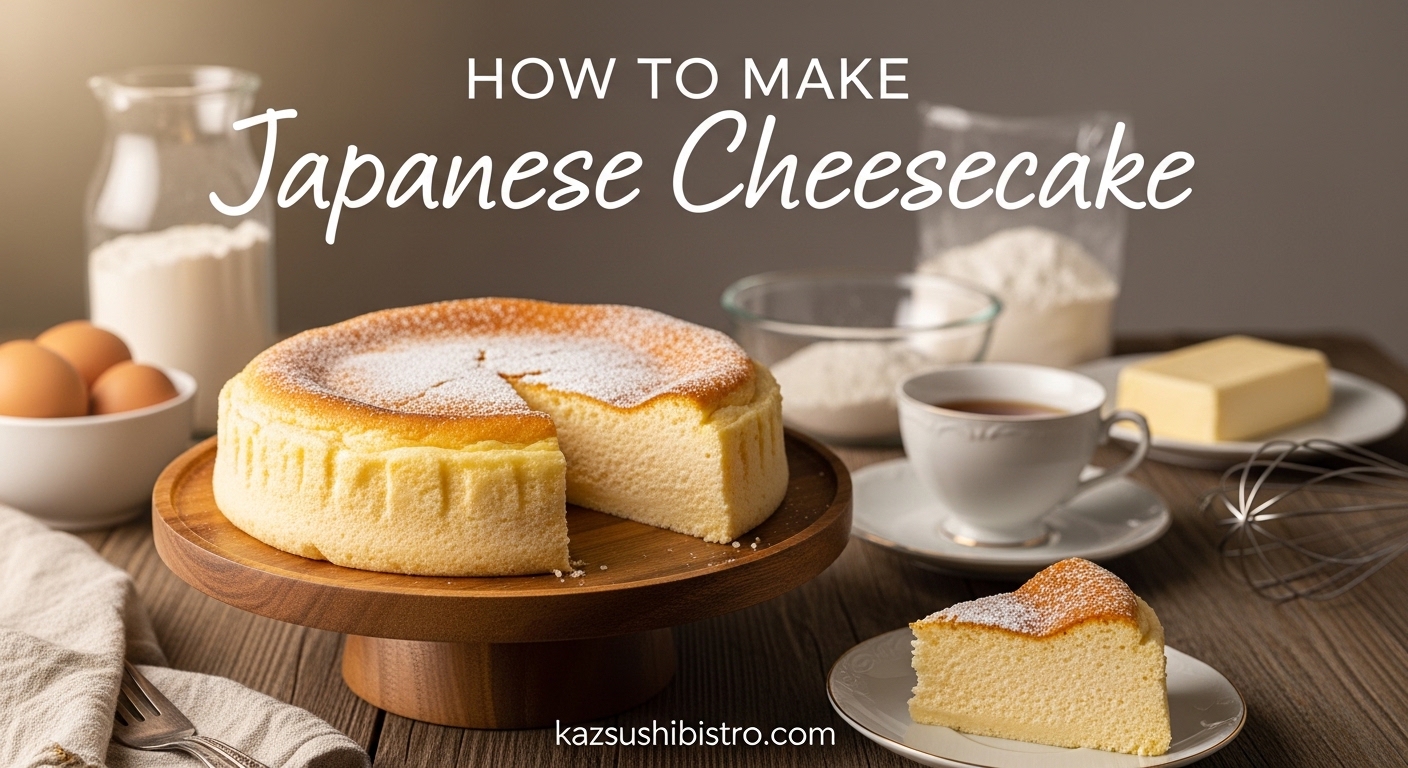
Unlike dense American cheesecakes, this version uses whipped egg whites folded into the batter. The result is a cake that rises several inches above the pan during baking, creating a tall, golden crown. When you take your first bite, it dissolves on your tongue like sweet cotton candy, leaving behind a subtle cream cheese flavor without the heavy richness of traditional cheesecake.
Table of Contents
What Makes Japanese Cheesecake So Special 2026
The secret lies in the meringue. By whipping egg whites and folding them into a cream cheese base, you introduce thousands of tiny air bubbles into the batter. During baking, these bubbles expand in the oven heat, causing the cheesecake to rise dramatically. The water bath creates steam that helps the cake inflate even further.
This technique creates a texture unlike any other dessert. The top portion stays incredibly fluffy and light. The bottom develops a thin, slightly denser layer that provides structure. When warm, the cheesecake jiggles with a mesmerizing wobble that makes it perfect for sharing on social media.
The flavor profile also differs from American cheesecake. Japanese cheesecake uses less sugar and cream cheese, letting the egg flavor shine through alongside subtle sweetness. Many recipes include a touch of lemon juice or zest to brighten the flavor without overpowering the delicate balance.
Why You’ll Love This Japanese Cheesecake Recipe?
After testing dozens of recipes and consulting with professional bakers, I developed this version that balances reliability with impressive results. The instructions include specific visual cues at every stage, so you know exactly when your meringue has reached the right consistency and when your cheesecake is properly baked.
This recipe produces a cheesecake that rises approximately 3 inches above the rim of an 8-inch pan. The texture stays fluffy even after cooling, unlike some versions that deflate completely into a dense disk. The flavor strikes the perfect balance between sweet and tangy, with enough cream cheese presence to satisfy cheesecake lovers while remaining light enough to eat a generous slice.
The recipe also provides clear troubleshooting guidance. I address the most common failures I encountered: deflation, cracking, dense bottoms, and undercooked centers. By following the techniques in this guide, your success rate will improve dramatically even on your first attempt.
Ingredients for Japanese Cheesecake
Gathering the right ingredients before you begin makes the process smoother. This recipe uses standard baking staples, but ingredient quality and temperature matter significantly for the final result. Read through the entire list before starting, as some items need preparation time.
Core Ingredients
For the Cream Cheese Base:
- 8 ounces (227g) full-fat cream cheese, at room temperature
- 3 tablespoons (45g) unsalted butter, at room temperature
- 1/2 cup (120ml) whole milk
- 6 large eggs, separated (yolks at room temperature, whites cold)
- 1/4 cup (50g) granulated sugar
- 1/4 cup (30g) cake flour
- 2 tablespoons (15g) cornstarch
- 1 teaspoon lemon juice
- 1/2 teaspoon vanilla extract
For the Meringue:
- 6 large egg whites (from the separated eggs above)
- 1/4 teaspoon cream of tartar
- 1/3 cup (65g) granulated sugar
For Serving:
- Powdered sugar for dusting
- Optional: apricot jam thinned with water for glaze
The cream cheese must be full-fat and at room temperature. Low-fat versions lack the structure needed to hold the air bubbles. Cold cream cheese will create lumps in your batter that cannot be smoothed out later. Leave it on the counter for at least one hour before starting, or microwave in 10-second bursts until soft but not melted.
The eggs require special handling. Separate them while cold, then let the yolks come to room temperature for about 30 minutes. Keep the whites in the refrigerator until you are ready to whip them. Cold egg whites whip up with more volume and greater stability, which directly impacts how tall your cheesecake rises.
Ingredient Substitutions That Work
| Original Ingredient | Substitution | Notes |
|---|---|---|
| Cake flour | All-purpose flour minus 1 tablespoon | Remove 1 tablespoon from 1/4 cup measure, replace with cornstarch |
| Whole milk | 2% milk or half-and-half | Whole milk creates best texture, but 2% works in a pinch |
| Cream of tartar | 1/2 teaspoon lemon juice or white vinegar | Added to egg whites for stability |
| Unsalted butter | Salted butter (reduce added salt) | Omit any additional salt in recipe |
| Cornstarch | Potato starch or tapioca starch | Same amount, similar results |
I do not recommend substituting the cream cheese with any other product. Neufchatel cheese lacks the fat content needed. Mascarpone creates a different texture entirely. Low-fat cream cheese simply will not work for this recipe.
Equipment You Need
Japanese cheesecake requires specific equipment for success. While you can improvise some items, the springform pan and electric mixer are non-negotiable. This section explains what you need and why each item matters.
Essential Equipment
8-inch round springform pan: This is the standard size for Japanese cheesecake recipes. The springform sides release easily without damaging the tall, delicate cake. Do not use a regular cake pan unless you plan to serve the cheesecake directly from it without removing it. The pan must be at least 3 inches deep to accommodate the rising batter.
Parchment paper: You need enough to line the bottom of the pan and create a 4-inch tall collar around the sides. The parchment collar supports the cheesecake as it rises above the pan rim. Use regular parchment, not wax paper which can melt or stick.
Electric mixer: A stand mixer or hand mixer both work for whipping the egg whites. The meringue requires 8-10 minutes of continuous whipping at medium-high speed. Doing this by hand would take approximately 20 minutes of vigorous whisking and rarely achieves the necessary volume.
Large roasting pan or deep baking dish: This holds the water bath that your cheesecake will sit in during baking. The pan must be large enough to accommodate your springform pan with at least 1 inch of space on all sides. It needs to be at least 2 inches deep to hold enough water.
Digital kitchen scale: Precision matters in this recipe. Volume measurements for flour and sugar can vary by 20% depending on how you scoop. A scale ensures consistency every time.
Nice-to-Have Equipment
Oven thermometer: Many home ovens run hot or cold by 25 degrees or more. Since temperature accuracy directly affects whether your cheesecake rises and cracks, an oven thermometer helps you adjust accordingly.
Large rubber spatula: Folding the meringue requires a tool with a wide, flat surface. A thin spatula or wooden spoon will deflate the batter more than necessary.
Pastry brush: Useful for applying the optional apricot glaze to the finished cheesecake.
How to Make Japanese Cheesecake
This section contains the complete step-by-step instructions. Read through the entire process before beginning. Japanese cheesecake requires continuous work once you start whipping the egg whites, so preparation is essential.
Step 1: Prepare Your Equipment
Preheat your oven to 320°F (160°C). Position the oven rack in the lower third of the oven. This positioning helps the cheesecake cook through evenly without collapsing.
Prepare your springform pan. Line the bottom with a circle of parchment paper. Cut a strip of parchment 4 inches wide and long enough to wrap around the inside of the pan with a slight overlap. This creates a collar that extends above the pan rim to support the rising batter.
Grease the parchment lightly with butter or cooking spray. This prevents the cheesecake from sticking to the collar as it rises and falls. Place the prepared pan inside your large roasting pan, but do not add water yet.
Set a kettle or pot of water to boil. You will need approximately 4 cups of hot water for the water bath. Keep it hot until you are ready to bake.
Separate your eggs now if you have not already. Place the yolks in a small bowl to come to room temperature. Keep the whites in a large, completely clean mixing bowl in the refrigerator. Any trace of grease or yolk in the whites will prevent them from whipping properly.
Step 2: Make the Cream Cheese Batter
In a large heatproof bowl, combine the room temperature cream cheese, butter, and milk. Place this bowl over a pot of simmering water, creating a double boiler. The water should not touch the bottom of your bowl.
Stir continuously until the cream cheese and butter melt completely and the mixture becomes smooth. This takes approximately 5 minutes. Remove from heat immediately once smooth to prevent overheating.
Whisk in the egg yolks one at a time, mixing thoroughly after each addition. The mixture should look glossy and well-combined.
Add the sugar, cake flour, and cornstarch. Whisk until no lumps remain. The batter should be smooth and pourable.
Stir in the lemon juice and vanilla extract. Set this cream cheese batter aside while you prepare the meringue.
Step 3: Whip the Egg Whites to Perfect Peaks
Remove your cold egg whites from the refrigerator. Add the cream of tartar to the whites. This acidic ingredient stabilizes the protein structure, helping the meringue hold its shape better during folding and baking.
Begin whipping with your electric mixer on medium speed. After 30 seconds, when the whites turn foamy, gradually add the sugar in three additions. Adding sugar gradually creates a more stable meringue than dumping it all in at once.
Continue whipping on medium-high speed for 8-10 minutes total. Watch carefully for the right stage. You want firm peaks, not stiff peaks.
Firm peaks hold their shape when you lift the beaters, but the tip of the peak curves slightly like a bird’s beak. Stiff peaks stand completely straight and upright. Over-whipping to stiff peaks creates a meringue that is difficult to fold and may cause the cheesecake to crack during baking.
Test your peaks by lifting the beaters straight up. The meringue should form a peak that bends slightly at the tip. If it stands perfectly straight, you have gone too far. If the meringue slides off the beaters without holding any shape, keep whipping.
Step 4: Fold Meringue Into the Batter
Working quickly but gently, fold one-third of the meringue into the cream cheese batter. This first addition lightens the batter, making it easier to incorporate the remaining meringue without deflating it.
Use a rubber spatula and a folding motion. Cut down through the center of the mixture to the bottom of the bowl. Scrape across the bottom, then turn the spatula to fold that portion up over the top. Rotate the bowl one-quarter turn and repeat.
Continue folding until no white streaks remain. This first addition can be mixed more thoroughly since you still have most of the meringue to add.
Add another third of the meringue. Fold more gently this time, using the same technique but with lighter strokes. Stop when most of the white streaks disappear.
Add the final third of meringue. Fold extremely gently now, making only 10-15 strokes total. Some small white streaks are acceptable at this stage. Better to leave a few streaks than to over-mix and deflate the batter.
The batter should look light, fluffy, and voluminous. If it appears thin or runny, you may have over-mixed or under-whipped your meringue.
Step 5: Bake in a Water Bath
Pour the batter into your prepared springform pan. Fill it almost to the top of the parchment collar. Tap the pan gently on the counter 2-3 times to release any large air bubbles.
Place the roasting pan (with the cheesecake pan inside) onto your preheated oven rack. Carefully pour the hot water into the roasting pan, filling it approximately 1 inch deep. Do not splash water onto the cheesecake batter.
Close the oven door and bake at 320°F for 20 minutes. The cheesecake will begin rising during this time.
After 20 minutes, reduce the oven temperature to 280°F (140°C) without opening the oven door. Continue baking for 40-50 minutes. This lower temperature cooks the cheesecake through gently while preventing cracks and collapse.
The cheesecake is done when the top is golden brown, the surface looks dry and set, and the cake jiggles as a whole unit when you gently shake the pan. The internal temperature should reach 160°F if you use a thermometer.
Turn off the oven heat, but leave the cheesecake inside with the door closed for 10 minutes. This gradual temperature change prevents sudden collapse.
Step 6: Cool Gradually (This Step is Critical)
After the 10-minute resting period, crack the oven door open approximately 6 inches. A wooden spoon works well to prop it open. Let the cheesecake cool in the oven for 30 minutes.
Remove the cheesecake from the oven. It will have fallen slightly from its maximum height, which is normal. Run a thin knife around the edge between the parchment and the pan to release any stuck portions.
Let the cheesecake cool at room temperature for 1 hour. Then remove the springform pan sides and peel away the parchment collar.
Transfer to a serving plate and refrigerate for at least 2 hours before serving. The cold firms up the texture and improves the flavor. Some purists prefer eating Japanese cheesecake while still slightly warm for maximum fluffiness, but chilling makes slicing cleaner.
Dust with powdered sugar before serving. For a professional touch, brush the top with a thin glaze of apricot jam mixed with a little warm water.
Pro Tips for Success
These tips come from my own failures and successes, plus insights from professional bakers who specialize in Japanese desserts. Following these recommendations dramatically improves your success rate.
Preparation Tips
Read the entire recipe twice before starting. Once you begin whipping egg whites, you cannot pause to check the next step. The meringue starts losing volume within minutes of stopping the mixer.
Measure all ingredients before you begin. Have your flour and cornstarch sifted together. Have your cream cheese soft and ready. This mise en place approach prevents rushed mistakes during the critical mixing phase.
Clean your mixing bowls and beaters thoroughly. Any trace of grease prevents egg whites from whipping. I wipe my bowls with white vinegar before use to ensure they are completely grease-free.
Use room temperature cream cheese but cold egg whites. This combination sounds contradictory but creates the best results. The warm cheese blends smoothly, while cold whites whip to maximum volume.
Mixing and Folding Tips
Do not over-whip your meringue. Firm peaks that curve slightly whip faster and fold more easily than stiff peaks. Over-whipped meringue creates a dry cheesecake that cracks on top.
Use a large bowl for folding. You need space to cut down through the center and fold over without spilling. A bowl that seems too large is actually the right size.
Rotate the bowl as you fold. This ensures even incorporation without over-mixing any one section. Think of folding as a gentle lifting motion, not stirring or beating.
Work quickly once folding begins. The meringue starts deflating the moment you stop whipping. Aim to get the batter into the oven within 5 minutes of finishing the fold.
Baking Tips
Never open the oven door during the first 20 minutes of baking. The rush of cold air can cause the cheesecake to collapse prematurely. Use your oven light to check progress if needed.
Check your oven temperature with a thermometer. Home ovens often run 25 degrees hotter or colder than the dial indicates. If your oven runs hot, your cheesecake will crack. If it runs cold, it will not rise properly.
Use hot, not boiling, water for the water bath. Boiling water can start cooking the bottom of your cheesecake too quickly, creating a dense layer. Water that is hot from the tap works well, or boiled water that has cooled for 2 minutes.
Fill the water bath after placing the pan in the oven. Pouring water into the roasting pan while it sits on your counter risks splashing the cheesecake batter. The water bath should come about 1 inch up the sides of your springform pan.
Cooling Tips (Don’t Skip These)
The gradual cooling process is non-negotiable. I once tried removing my cheesecake immediately from the oven to show friends the impressive height. It deflated completely within 60 seconds, turning from a tall soufflé into a flat pancake.
Cool the cheesecake in the closed oven first, then with the door cracked. This two-stage cooling prevents the thermal shock that causes collapse.
Do not refrigerate the cheesecake while it is still warm. Condensation will form on the surface and make it soggy. Let it reach room temperature first, about 1 hour on the counter.
Expect some deflation. Even perfectly baked Japanese cheesecake will fall about 30% from its maximum height as it cools. This is normal and expected. The final height should still be approximately 2.5 inches tall.
Troubleshooting: Why Did My Japanese Cheesecake Deflate?
Even experienced bakers encounter problems with Japanese cheesecake. This section addresses the most common failures with specific solutions. Each problem has multiple potential causes, so read through all the possibilities for your issue.
Problem: Cheesecake Collapsed or Deflated
A collapsed cheesecake has several possible causes. Underbaking is the most common culprit. If the internal structure has not set completely, the cheesecake cannot support its own weight and collapses as it cools. Bake until the internal temperature reaches 160°F, or until the top springs back when gently pressed.
Opening the oven door too early also causes collapse. The temperature drop shocks the delicate air bubbles, causing them to burst. Keep the oven closed for at least the first 20 minutes, preferably the entire first stage of baking.
Over-mixing during the folding stage deflates the meringue before baking even begins. If your batter looked thin and runny going into the pan, you likely over-mixed. Fold just until the white streaks disappear.
Cooling too quickly breaks the internal structure. Always cool gradually in the oven first, then with the door cracked, then at room temperature. Never move a hot cheesecake directly to a cold refrigerator.
Problem: Cracked Top
Cracks occur when the cheesecake rises too quickly or the oven temperature is too high. The surface sets before the interior finishes expanding, creating tension that splits the top.
Check your oven temperature with a thermometer. If it runs hot, reduce your baking temperature by 25 degrees. The lower temperature cooks the cheesecake more evenly.
Over-whipped meringue also causes cracks. When egg whites are whipped to stiff peaks rather than firm peaks, they create larger, more unstable air bubbles that expand aggressively in the oven heat. Whip only until peaks curve slightly at the tips.
If your cheesecake cracks, it will still taste delicious. Dust generously with powdered sugar to hide the cracks before serving.
Problem: Dense Layer at Bottom
A dense bottom layer with fluffy top indicates that the meringue and base did not fully incorporate. The meringue floated to the top during baking while the heavier batter sank.
This happens when you under-mix during the folding stage. While over-mixing deflates the batter, under-mixing leaves layers of unincorporated meringue and batter. Fold until the mixture looks uniform with no streaks.
Baking at too low a temperature can also cause separation. The batter sits too long before setting, allowing layers to form. Ensure your oven reaches 320°F for the initial rise phase.
Problem: Raw or Undercooked Center
An undercooked center means insufficient baking time or temperature. Even if the top looks golden and set, the center may remain liquid. Japanese cheesecake requires longer baking than it appears to need.
Test for doneness by gently shaking the pan. The cheesecake should jiggle as one solid unit. If the center wobbles independently like a liquid, continue baking in 5-minute increments.
An oven that runs cold causes this problem consistently. Invest in an oven thermometer and adjust your baking temperature accordingly.
If the top is browning too quickly but the center remains raw, cover the top loosely with aluminum foil and continue baking at the lower temperature. This prevents burning while allowing the center to catch up.
Flavor Variations
Once you master the basic recipe, try these flavor variations. Each requires small adjustments to the base recipe while maintaining the same technique.
Matcha Japanese Cheesecake
Add 2 tablespoons of high-quality matcha powder to the dry ingredients. Sift it with the flour and cornstarch to prevent lumps. Matcha adds an earthy, slightly bitter complexity that balances the sweetness. Use ceremonial grade matcha for the best color and flavor.
Reduce the vanilla extract to 1/4 teaspoon, as it competes with matcha flavor. The baking time remains the same. Dust the finished cheesecake with additional matcha powder mixed with powdered sugar for decoration.
Chocolate Japanese Cheesecake
Replace 2 tablespoons of the cake flour with unsweetened cocoa powder. Sift it thoroughly with the remaining flour. Use Dutch-processed cocoa for a smoother, less acidic flavor.
Add 1 tablespoon of sugar to the base batter to balance cocoa’s bitterness. The cheesecake will appear slightly denser than the vanilla version due to cocoa’s drying effect, but should still rise well.
Citrus Japanese Cheesecake
Increase the lemon juice to 2 tablespoons and add 1 tablespoon of finely grated lemon zest to the cream cheese batter. The bright citrus flavor cuts through the richness of the cream cheese beautifully.
For yuzu cheesecake, use 1 tablespoon of yuzu juice instead of lemon. Yuzu provides a more complex, aromatic citrus flavor. Fresh yuzu juice is best, but bottled works if that is all you can find.
How to Serve and Store
Japanese cheesecake offers flexibility in serving temperature. Each option provides a different experience.
Serve warm for maximum jiggle and fluffiness. The texture is at its airiest within 30 minutes of coming from the oven. Use a sharp knife dipped in hot water for cleanest slices.
Serve at room temperature for balanced flavor. The cheesecake firms slightly, making it easier to cut and handle. This temperature brings out the subtle cream cheese flavor best.
Serve chilled for a denser, more traditional cheesecake experience. After 4 hours in the refrigerator, the texture becomes more similar to a light American cheesecake. This is how most Japanese bakeries sell their cheesecakes.
Store leftover cheesecake in an airtight container in the refrigerator for up to 3 days. The texture will continue to compress slightly each day, becoming denser over time.
Freeze individual slices wrapped tightly in plastic wrap, then aluminum foil, for up to 1 month. Thaw overnight in the refrigerator. The texture changes slightly after freezing, becoming somewhat denser, but remains delicious.
Frequently Asked Questions
What are the ingredients in Japanese cheesecake?
Japanese cheesecake contains cream cheese, eggs, butter, milk, sugar, cake flour, and cornstarch. The eggs are separated, with yolks going into the cream cheese base and whites whipped into a meringue that creates the fluffy texture. Optional ingredients include lemon juice, vanilla extract, and cream of tartar to stabilize the egg whites.
How is a Japanese cheesecake different from regular cheesecake?
Japanese cheesecake uses whipped egg whites folded into the batter, creating a soufflé-like texture that rises tall during baking. It is lighter, fluffier, and less sweet than American cheesecake. The texture is airy and cotton-like rather than dense and creamy. It is also baked in a water bath and requires gradual cooling to prevent collapse.
Is Japanese cheesecake hard to make?
Japanese cheesecake requires attention to technique but is achievable with practice. The meringue folding and temperature control are the challenging parts. Most beginners succeed by their second or third attempt. Following a detailed recipe with visual cues for meringue stages significantly improves your success rate.
Why does my Japanese cheesecake deflate?
Deflation usually occurs from underbaking, opening the oven door too early, over-mixing the batter, or cooling too quickly. The cheesecake needs to cook completely through to support its structure, cool gradually in the oven with the door cracked, and be handled gently. Never move a hot cheesecake directly to a cold environment.
Can I use all-purpose flour instead of cake flour?
Yes, substitute cake flour by using all-purpose flour and removing 1 tablespoon from your 1/4 cup measure, replacing it with cornstarch. This mimics cake flour’s lower protein content. The texture will be slightly different but still successful. Do not use bread flour, which has too much protein.
Can I make Japanese cheesecake without cream of tartar?
Yes, substitute cream of tartar with 1/2 teaspoon of lemon juice or white vinegar added to the egg whites before whipping. Both provide the acidity needed to stabilize the meringue. The results will be nearly identical to using cream of tartar.
How do I know when my Japanese cheesecake is done?
The cheesecake is done when the top is golden brown, the surface looks dry and set, and the entire cake jiggles as one unit when shaken gently. The internal temperature should reach 160°F. A toothpick inserted in the center should come out clean or with a few moist crumbs.
Can I freeze Japanese cheesecake?
Yes, Japanese cheesecake freezes well for up to 1 month. Wrap individual slices tightly in plastic wrap, then aluminum foil. Thaw overnight in the refrigerator. The texture becomes slightly denser after freezing but remains delicious. For best texture, enjoy within 3 days of baking or thawing.
Ready to Bake Your First Japanese Cheesecake?
Learning how to make Japanese cheesecake takes patience, but the reward is worth every attempt. That moment when you open your oven to reveal a tall, golden cloud of a cheesecake makes all the effort worthwhile. The first bite, airy and delicate with just enough cream cheese richness, explains why this dessert has captured the world’s attention.
Remember that the meringue technique forms the foundation of success. Watch for those firm peaks that curve slightly at the tip. Fold gently but thoroughly. Bake in a water bath at controlled temperatures. And never rush the cooling process. These principles will guide you to consistent results.
If your first attempt deflates or cracks, do not be discouraged. Even professional bakers in Osaka bakeries occasionally have batches that do not rise perfectly. Each attempt teaches you something about your oven, your mixing technique, and the visual cues that indicate success. By your third cheesecake, you will likely produce something worthy of any bakery window.
Now gather your ingredients, preheat your oven, and prepare to create something magical. Your jiggly, fluffy Japanese cheesecake awaits.