Understanding the difference between honing and sharpening is one of the most important skills any home cook can develop. I have seen countless people ruin good knives by sharpening them too frequently, while others struggle with dull blades because they never learned to hone properly. Honing vs sharpening is not a matter of choosing one over the other; it is about knowing when each technique serves your knife best.
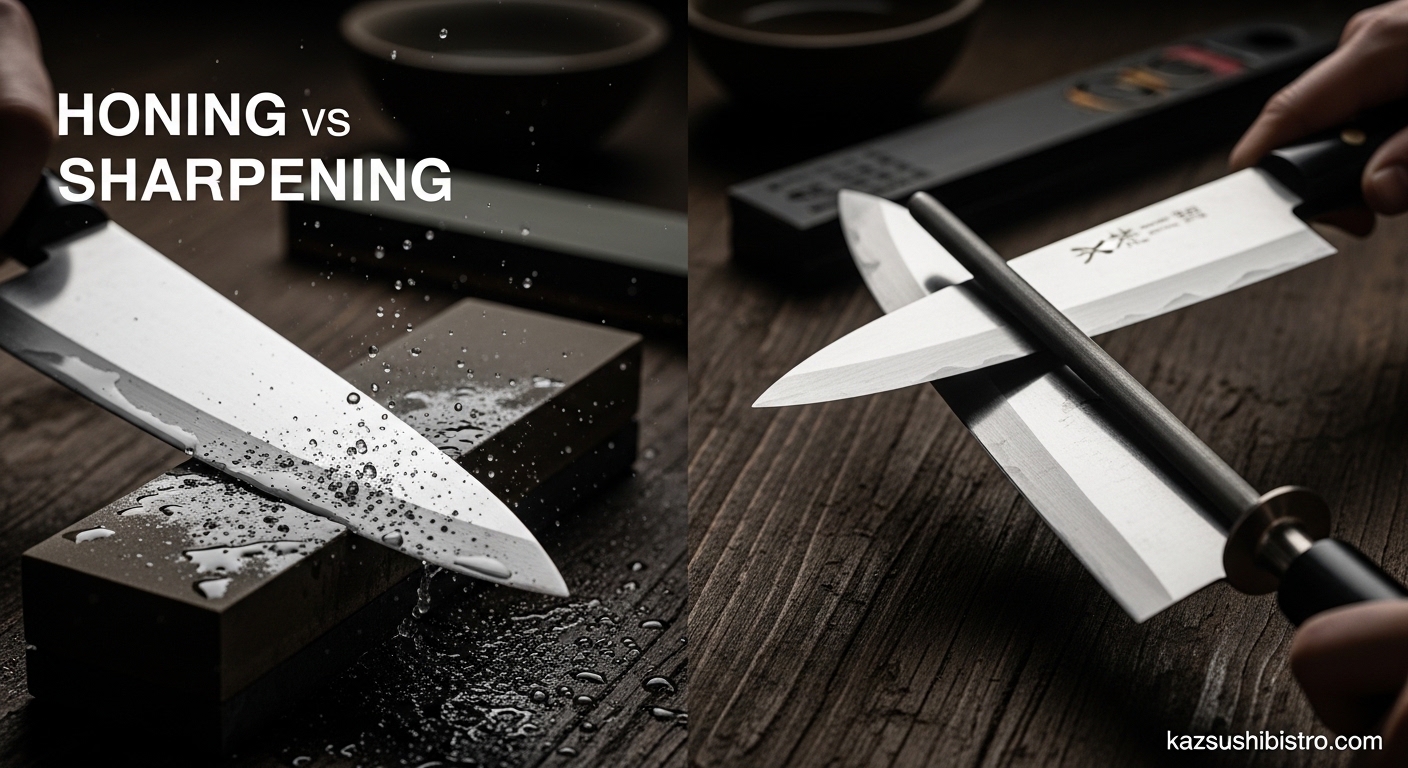
Honing realigns the blade edge without removing metal, while sharpening removes metal to create a new edge. This fundamental distinction determines how often you should perform each technique and which tools you need in your kitchen. A well-maintained knife can last decades with proper honing and only occasional sharpening.
In this guide, I will walk you through everything you need to know about these two essential knife care techniques. You will learn how to identify when your knife needs honing versus when it truly needs sharpening. By the end, you will have the confidence to maintain your knives like a professional chef.
Table of Contents
What is Honing – Definition and Process
Honing is the process of realigning a knife’s blade edge without removing any metal from the blade. Over time, with regular use, the thin edge of your knife bends and folds slightly to one side, creating what professionals call a micro-bevel. This micro-bevel does not mean your knife is dull; it simply means the edge is no longer pointing straight down.
Think of honing as combing hair that has gotten messy. The hair is still there, but it needs to be straightened to look and function properly. A honing steel or honing rod acts like that comb, gently pushing the edge back into proper alignment.
The tools used for honing include honing steels (also called sharpening steels, though this is technically a misnomer), ceramic rods, and diamond-coated rods. Each tool works slightly differently. A traditional honing steel is made of hardened steel with fine ridges that catch the blade edge. Ceramic rods are smoother and remove a microscopic amount of metal. Diamond rods are more aggressive and should be used sparingly.
Professional chefs hone their knives before every use or at least once per day. The process takes only ten to fifteen seconds once you learn the proper technique. Honing does not damage your knife because it removes essentially zero material from the blade.
What is Sharpening – Definition and Process 2026
Sharpening is the process of removing metal from the knife blade to create an entirely new edge. When a knife becomes truly dull, the edge has either worn down completely, developed chips, or rounded off from use and repeated honing. No amount of honing can restore an edge that no longer exists.
Sharpening involves abrasion, which is the wearing away of material through friction. You use abrasive surfaces like whetstones (also called sharpening stones), electric sharpeners, or manual pull-through sharpeners to grind away the dull steel and expose fresh, sharp steel underneath. This process actually changes the geometry of your blade edge.
Whetstones come in various grit grades, similar to sandpaper. Lower grit numbers (200-1000) remove more metal and are used for repairing damaged edges. Medium grits (1000-3000) sharpen dull knives. High grits (4000-8000) polish the edge to razor sharpness. Most home cooks only need a combination stone with 1000 and 6000 grit sides.
Electric and manual sharpeners use preset angles and abrasive wheels to remove metal. While convenient, they offer less control than whetstones and can remove more metal than necessary. Professional chefs generally prefer whetstones for their precision and gentleness on expensive blades.
Key Differences: Honing vs Sharpening
The most critical difference between honing and sharpening is whether metal is removed from the blade. Honing realigns the existing edge without material removal. Sharpening grinds away metal to create a fresh edge. This distinction affects everything from frequency to tools to technique.
| Aspect | Honing | Sharpening |
|---|---|---|
| Metal Removal | None (or microscopic) | Significant material removal |
| Purpose | Realigns bent edge | Creates new edge geometry |
| Frequency | Before each use or daily | Every 3-6 months for home cooks |
| Primary Tools | Honing steel, ceramic rod | Whetstone, electric sharpener |
| Time Required | 10-15 seconds | 10-20 minutes |
| Skill Level | Beginner-friendly | Requires practice |
| Effect on Knife Life | Extends lifespan | Gradually reduces blade size |
Another key difference involves the blade edge and how it interacts with food. A honed knife cuts cleanly because the edge points straight down. A sharpened knife cuts aggressively because the fresh edge is thin and precise. Both should feel sharp, but only sharpening can restore a blade that has lost its cutting ability entirely.
The angle at which you hold the knife also differs between techniques. Honing typically uses a slightly steeper angle (20 degrees) than sharpening, which varies by knife type. Japanese knives are sharpened at 15 degrees for a finer edge, while Western knives use 20 degrees for durability.
When to Hone Your Knife
You should hone your knife regularly as part of routine knife maintenance. The general rule is to hone before each major cooking session or at least once per day if you cook frequently. This keeps the blade edge aligned and prevents the gradual decline in cutting performance that leads people to over-sharpen.
Signs that your knife needs honing include: the blade drags through food instead of slicing cleanly, you need to use more pressure than usual, cuts look ragged rather than precise, or the knife feels different than it did when freshly sharpened. These symptoms indicate a misaligned edge rather than a truly dull blade.
Home cooks often ask how often they should hone their knives. The honest answer depends on usage. If you cook dinner five nights per week, honing twice weekly is sufficient. Professional chefs who use their knives for hours daily may hone multiple times per shift. The good news is that you cannot really over-hone a knife.
I recommend keeping your honing rod easily accessible in your kitchen. The easier it is to grab, the more likely you will maintain the habit. A quick ten-second honing session before you start chopping vegetables will make your prep work faster and safer.
When to Sharpen Your Knife
You should sharpen your knife when honing no longer restores its cutting performance. This typically happens every three to six months for home cooks who use their knives regularly. Professional chefs may need to sharpen monthly depending on their knife care habits and cutting volume.
The signs that indicate sharpening is necessary include: the knife fails the paper test (cannot slice through paper cleanly), it struggles with soft foods like tomatoes, honing makes no noticeable improvement, or the edge has visible chips or damage. These symptoms mean the blade edge has worn down and needs to be rebuilt.
Many home cooks make the mistake of sharpening too frequently. Remember that every sharpening session removes metal from your blade. Over-sharpening will gradually wear down your knife, reducing its lifespan significantly. I have seen knives that should last twenty years become nubs after five years of unnecessary sharpening.
Before you decide to sharpen, always try honing first. Honing takes seconds and costs nothing. If honing restores the edge, you have saved your knife from unnecessary wear. Only proceed to sharpening when honing clearly fails to improve cutting performance.
How to Hone a Knife (Step-by-Step)
Learning to hone a knife properly takes practice, but the technique is simple once you understand the basics. You will need a honing steel or ceramic rod and a stable surface. The entire process should take about ten to fifteen seconds per session.
Step 1: Position the Rod
Hold the honing rod vertically with the tip resting on a cutting board or countertop. The rod should be stable and secure. Some people prefer to hold the rod with the tip facing up, but this risks injury if the knife slips. I recommend the tip-down position for safety.
Step 2: Find the Angle
Hold your knife at approximately a 20-degree angle against the rod. To visualize this, imagine the knife is slicing a thin slice off the honing steel. If you have a Western-style knife (German, American, or European), 20 degrees is correct. If you have a Japanese knife, aim for 15 degrees.
Step 3: Draw the Blade Down
Starting at the heel of the blade (near the handle), draw the knife down and across the rod in one smooth motion, ending at the tip. Apply light, consistent pressure. You should hear a gentle ringing sound. Do not press hard; let the steel do the work.
Step 4: Alternate Sides
Switch to the other side of the blade and repeat the motion on the opposite side of the rod. Alternate sides with each stroke. I recommend five strokes per side for routine maintenance, or up to ten if the knife feels particularly dull.
Step 5: Test the Edge
After honing, carefully test the edge by slicing through a piece of paper or cutting a tomato. The knife should feel noticeably sharper. If not, repeat the process with a few more strokes per side.
How to Sharpen a Knife (Methods)
Sharpening requires more skill than honing, but mastering the technique will give you control over your knife’s performance. I recommend learning the whetstone method for the best results, though other options exist for those who prefer convenience.
Method 1: Whetstone Sharpening
Start by soaking your whetstone in water for the time recommended by the manufacturer, typically 10-15 minutes. Place the stone on a stable surface with a towel underneath to prevent slipping.
Hold the knife at the proper angle (15 degrees for Japanese knives, 20 degrees for Western knives) with the edge facing away from you. Draw the blade across the stone from heel to tip, maintaining consistent pressure and angle. Repeat this motion 10-15 times.
Flip the knife and repeat on the other side. Continue alternating sides until you feel a slight burr (a rough edge) forming on the opposite side of the blade you are sharpening. This burr indicates the edge has reached the center.
Once the burr forms, reduce pressure and finish with lighter strokes to polish the edge. If your stone has a fine grit side, switch to that for the final polishing stage. Rinse the knife and test for sharpness.
Method 2: Electric Sharpeners
Electric sharpeners offer preset angles and abrasive wheels that grind the edge automatically. Simply draw the knife through the slots as directed by the manufacturer. Start with the coarsest setting and progress to finer settings.
While convenient, electric sharpeners remove more metal than necessary and offer less control. They can also generate heat that affects the blade’s temper if used improperly. I recommend these only for inexpensive knives or those who lack the time to learn whetstone sharpening.
Method 3: Manual Pull-Through Sharpeners
These handheld devices have preset angles and abrasive slots. Draw the knife through the coarse slot several times, then the fine slot. They are affordable and easy to use but aggressive on blades. Use these only for quick touch-ups, not regular maintenance.
Sharpness Tests (Tomato Test and Paper Test)
Knowing how to test your knife’s sharpness helps you decide whether to hone or sharpen. Two simple tests work well for home cooks: the paper test and the tomato test. Both give immediate feedback on your blade’s condition.
The Paper Test
Hold a sheet of printer paper by one corner with your non-dominant hand. Lay the knife edge against the top edge of the paper at a shallow angle. Slice downward and outward in a smooth motion. A sharp knife will slice cleanly through the paper with no tearing or resistance.
If the paper crumples, tears, or the knife cannot cut through at all, the blade needs attention. Try honing first, then test again. If honing does not help, sharpening is required.
The Tomato Test
Place a ripe tomato on a cutting board. Hold the knife at the tomato’s surface without applying downward pressure. Draw the knife across the skin. A truly sharp knife will bite into the skin immediately and slice through with minimal effort.
A dull knife will skid across the tomato skin or require you to press down to pierce it. If you find yourself sawing back and forth or crushing the tomato, your knife definitely needs sharpening after honing fails to help.
I use both tests regularly. The paper test is quick and clean, perfect for checking after honing. The tomato test better represents real kitchen performance because food has moisture and texture that paper lacks.
Honing vs Sharpening vs Stropping
To fully understand knife maintenance, you should know about stropping as well. Stropping is a third technique that sits between honing and sharpening in terms of material removal and edge refinement. It is common in professional sharpening but often missing from home kitchen guides.
Stropping involves drawing the blade across a leather strop loaded with fine abrasive compound. Unlike honing, stropping removes a microscopic amount of metal. Unlike sharpening, it removes so little that it is considered a finishing technique rather than a restorative one.
The purpose of stropping is to polish the edge to maximum sharpness after sharpening. It removes the tiny burr left from sharpening and aligns the microscopic teeth of the edge. Barbers strop straight razors, and woodworkers strop chisels. For kitchen knives, stropping is optional but produces exceptional results.
Think of the three techniques as a progression. Honing maintains an already-sharp edge with zero material removal. Stropping polishes and refines with minimal material removal. Sharpening restores a worn edge by removing significant material. Together, they form a complete knife care system.
If you sharpen your knives at home, consider adding a leather strop to your kit. After sharpening on your finest grit stone, make a few passes on the strop. The difference in sharpness is immediately noticeable, especially on high-quality steel.
Frequently Asked Questions
Is honing better than sharpening?
Neither technique is inherently better. They serve different purposes in knife maintenance. Honing is for regular maintenance to keep a sharp knife performing well. Sharpening is for restoring a knife that has become truly dull. You need both for proper knife care.
Does a honing rod actually sharpen a knife?
No, a honing rod does not sharpen a knife in the technical sense. Honing rods realign the blade edge without removing metal. Sharpening requires removing metal to create a new edge. A honing rod maintains sharpness but cannot create it on a dull blade.
Can you hone a knife too much?
No, you cannot hone a knife too much. Honing removes essentially zero material from the blade, so there is no risk of damaging the knife through excessive honing. Professional chefs hone their knives multiple times per day. The only potential downside is wasting a few seconds of your time.
How do chefs keep their knives so sharp?
Professional chefs keep their knives sharp through consistent honing and proper technique. They hone before each use or multiple times per day. They sharpen only when necessary, typically every few weeks or months depending on usage. They also use proper cutting boards and avoid hard surfaces that damage edges.
Conclusion
Understanding honing vs sharpening is the foundation of proper knife care. Honing realigns your blade edge without removing metal and should be done regularly. Sharpening removes metal to create a new edge and should be done only when honing no longer restores performance.
The key takeaway is simple: hone often, sharpen rarely. A few seconds of honing before each cooking session will keep your knives performing at their peak. Reserve sharpening for those times when your knife truly needs restoration.
With the techniques and tests outlined in this guide, you now have everything you need to maintain your knives like a professional. Start with a quick honing session today, and enjoy the difference a properly maintained edge makes in your cooking.