Learning how to make tamagoyaki Japanese rolled omelette transformed my breakfast routine. This delicate, layered egg dish looks impressive but requires just a few simple ingredients and some practice with the rolling technique. Whether you want to elevate your weekend brunch or add authentic flair to homemade bento boxes, tamagoyaki delivers that perfect balance of sweet and savory that makes Japanese home cooking so special.
After testing this recipe dozens of times in our kitchen, I have developed techniques that work for both traditional rectangular pans and standard round skillets. The first few attempts might look rustic, but by your third or fourth try, you will roll beautiful layered omelettes that rival what you get at sushi restaurants.
Table of Contents
What Is Tamagoyaki?
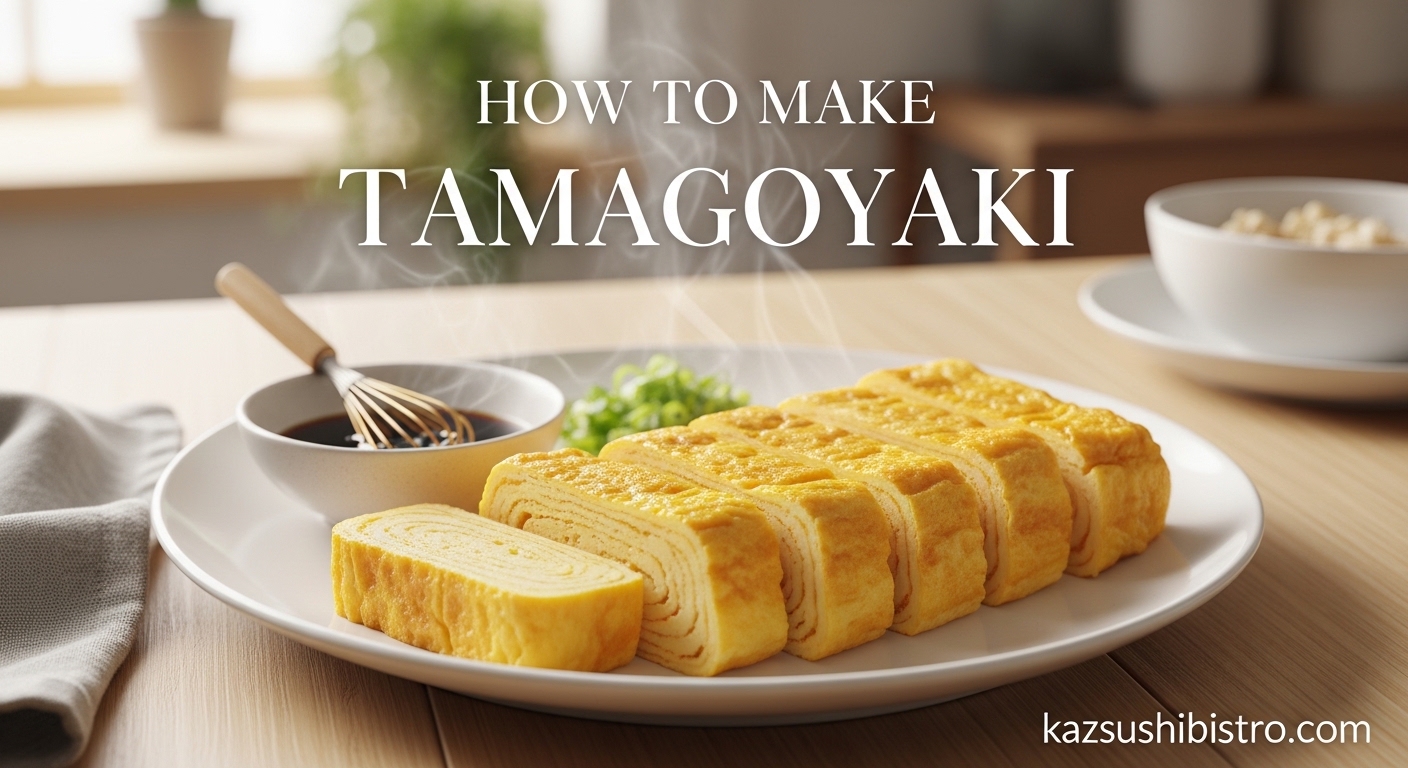
Tamagoyaki (玉子焼き) literally translates to “grilled egg” in Japanese. It is a traditional rolled omelette made by cooking seasoned eggs in thin layers and rolling them together into a compact, layered cylinder. Each bite reveals beautiful concentric circles of golden egg.
The signature flavor profile combines the natural richness of eggs with subtle sweetness from sugar and umami depth from dashi stock. Unlike French omelets that prize fluffy curds, tamagoyaki celebrates density and a slightly firm yet tender texture. You will find it everywhere in Japan, from convenience store breakfast sets to high-end sushi bars where it serves as the traditional final course.
What distinguishes great tamagoyaki from mediocre versions comes down to three factors: smooth texture without air bubbles, even layering without gaps, and that perfect balance where the omelette holds its shape but yields tenderly when bitten. The good news is that all three are achievable with the techniques I will share below.
Ingredients You’ll Need
Gather these simple ingredients before you start. The quality of your eggs matters significantly here since they are the star of the show. I prefer large organic eggs with deep orange yolks for the best color and flavor.
Basic Tamagoyaki Ingredients:
- 4 large eggs
- 1 tablespoon dashi stock (or substitute 1/4 teaspoon hondashi powder dissolved in 1 tablespoon warm water)
- 1 teaspoon sugar
- 1/2 teaspoon usukuchi (light) soy sauce, or regular soy sauce if unavailable
- 1/2 teaspoon mirin
- Pinch of salt
- Vegetable oil or neutral oil for cooking
About Dashi: Dashi is a Japanese stock made from kelp and bonito flakes that provides the characteristic umami backbone. While traditional tamagoyaki uses dashi, you can make a simpler version with just eggs and seasonings. The flavor will be less complex but still delicious. Hondashi powder, available at Asian grocery stores, offers a convenient shortcut.
Soy Sauce Substitutions: Usukuchi (light) soy sauce is traditional because it seasons without darkening the egg color. Regular soy sauce works fine but will produce a slightly darker, more brown-toned omelette. Low-sodium soy sauce is acceptable if you are watching salt intake.
Equipment and Tools
You have two paths here: traditional or adapted. I have successfully made tamagoyaki using both methods, and each produces excellent results with slightly different characteristics.
Traditional Equipment:
- Makiyakinabe (rectangular tamagoyaki pan), approximately 7×5 inches
- Chopsticks or wooden spatula for rolling
- Fine mesh sieve for straining eggs
- Small bowl with spout (makes pouring easier)
- Paper towels for oiling the pan
Round Pan Alternative:
If you do not own a rectangular tamagoyaki pan, use a 10-inch non-stick skillet. The technique changes slightly. Instead of rolling straight across, you will fold the egg into thirds like a letter, then roll that folded section. The final shape will be more cylindrical than rectangular, but the layered texture remains identical.
Heat control matters more than pan shape. You want medium-low heat that cooks the egg gently without browning. Too hot, and the layers become rubbery and dark. Too cool, and the egg takes forever to set, making rolling difficult.
How to Make Tamagoyaki Japanese Rolled Omelette: Step-by-Step Instructions (July 2026)
Follow these steps carefully. I have broken down the rolling technique into manageable stages that build your confidence as you progress.
Step 1: Prepare the Egg Mixture
Crack your eggs into a mixing bowl. Beat them gently with chopsticks or a fork until the yolks and whites combine. Avoid vigorous whisking that incorporates air bubbles. You want the mixture as smooth as possible.
Add the dashi, sugar, soy sauce, mirin, and salt. Stir until the sugar completely dissolves. This usually takes about 30 seconds of gentle mixing.
Strain the mixture through a fine mesh sieve into another bowl. This removes foam and ensures that silky texture tamagoyaki is known for. Let the strained mixture sit for a minute so any remaining bubbles rise to the surface. Skim them off with a spoon.
Step 2: Heat and Oil the Pan
Place your pan over medium-low heat. Fold a paper towel into a small pad and soak it with vegetable oil. This is your oiling tool throughout cooking.
Test the pan temperature by flicking a drop of water onto the surface. It should sizzle gently but not violently. If the water immediately evaporates with loud spitting, the pan is too hot. Remove it from heat for 30 seconds.
Wipe the heated pan surface with your oiled paper towel. You want a very thin, even coating. Excess oil creates strange texture on the egg surface.
Step 3: Cook the First Layer
Pour about one-quarter of your egg mixture into the pan. In a rectangular pan, tilt it slightly to spread the egg into a thin, even layer. In a round pan, swirl gently to coat the bottom.
Watch for the edges to begin setting while the center remains slightly wet and shiny. This takes about 20-30 seconds on properly heated pans. The egg should look mostly cooked but with a thin wet layer on top.
Step 4: Execute the First Roll
Using chopsticks or a spatula, start rolling the egg from the far end toward you. In a rectangular pan, roll straight across the short side. In a round pan, fold one-third toward the center, then fold the opposite third over that, creating a tri-fold.
Do not worry if the first roll looks imperfect. It gets easier with each layer. Push the rolled egg back to the far end of the pan.
Step 5: Build the Second Layer
Wipe the exposed pan surface with your oiled paper towel again. Pour another quarter of the egg mixture into the pan. Lift the rolled egg slightly with your chopsticks to let the new egg flow underneath.
Allow this layer to set partially, about 20-25 seconds. Then roll again, wrapping the new layer around the existing roll. The roll will get thicker.
Step 6: Complete the Remaining Layers
Repeat the oiling, pouring, and rolling process until you use all the egg mixture. Typically this creates 3-4 layers total. With each new layer, the roll grows larger and the rolling becomes easier because you have more structure to work with.
After the final roll, gently press the tamagoyaki against the pan surface for 10 seconds to seal the shape and ensure the center cooks through.
Step 7: Rest and Shape
Remove the tamagoyaki from the pan and transfer it to a cutting board. While still warm, shape it into a neat rectangle by gently pressing with your spatula or by rolling it in a bamboo sushi mat for 30 seconds.
Let it rest for 2-3 minutes before slicing. This resting period allows the layers to settle together and makes clean cuts possible.
Step 8: Slice and Serve
Using a sharp knife, slice the tamagoyaki into 6-8 even pieces. Wipe the knife between cuts for the cleanest presentation. The cross-section should reveal distinct layers that spiral through each piece.
Recipe Tips for Perfect Results
These insights come from my own trial and error over many breakfast sessions. Small adjustments make noticeable differences in your final tamagoyaki.
Strain Your Eggs: Never skip the straining step. Those tiny bubbles you remove are what create rubbery texture and visible holes in the finished omelette. Two minutes of patience here transforms your results.
Control Your Heat: Medium-low is not just a suggestion. High heat creates tough, browned layers with a sulfuric egg smell. The perfect tamagoyaki cooks gently to a pale golden color with tender texture throughout.
Use the Paper Towel Method: Wiping oil between layers prevents sticking while avoiding excess grease. This technique, learned from Japanese home cooks, gives you that characteristic smooth, glossy surface.
Rest Before Slicing: Cutting immediately after cooking causes layers to separate and creates ragged edges. Those two minutes of rest are non-negotiable for presentation.
Practice the Chopstick Grip: Holding chopsticks like pencils gives you the control needed for gentle rolling. If chopsticks feel awkward, a thin silicone spatula works as a beginner-friendly alternative.
Troubleshooting Common Problems
Every home cook hits these bumps when learning tamagoyaki. Here is how to fix them based on what I have experienced and learned from cooking forums.
Problem: My tamagoyaki breaks apart when I try to roll it.
Solution: Your pan is too hot or you waited too long to roll. The egg should still look slightly wet on top when you start rolling. If the surface looks completely dry and matte, you have waited too long. Lower your heat and roll sooner next time.
Problem: The layers stick to the pan despite using oil.
Solution: You need more frequent oiling between layers. Wipe that paper towel across the surface before every new pour. Also check your pan temperature. Too cool, and eggs stick. Too hot, and they stick worse.
Problem: My tamagoyaki is too dry and rubbery.
Solution: Overcooking is the culprit. Reduce heat and shorten cooking time for each layer. The egg should still have a slight jiggle when you start rolling. Carryover cooking will finish setting the interior during resting.
Problem: The layers have gaps between them.
Solution: Lift the existing roll slightly when pouring new egg mixture. This allows the liquid egg to flow underneath and bind with the previous layer. Without this contact, layers remain separate.
Problem: My tamagoyaki unravels when I slice it.
Solution: You need a sharper knife and a longer rest period. A dull knife compresses and squeezes the layers apart. Let the tamagoyaki cool for at least 3 minutes before slicing to allow full structure development.
Problem: The final roll looks messy and uneven.
Solution: Shape matters. Use a sushi mat or even a clean kitchen towel to gently roll and compress the warm tamagoyaki into a neat cylinder. This 30-second step transforms rustic into professional-looking.
Delicious Tamagoyaki Variations
Once you master the basic technique, experiment with these variations that appear in different regions of Japan.
Savory Dashimaki Style: Increase dashi to 3 tablespoons for a wetter, more custard-like interior. This Tokyo-style version is softer and more delicate. It requires gentler rolling but rewards you with incredibly tender texture.
Sweet Tamagoyaki: Double the sugar to 2 teaspoons and skip the soy sauce entirely. Some Kansai region versions use only sugar and mirin for a purely sweet profile that pairs beautifully with savory miso soup.
Add-In Variations: Finely chopped herbs like mitsuba or chives add color and freshness. Some cooks fold in tiny dried shrimp or grated cheese between layers for extra umami bursts. Keep additions minimal to maintain the layered structure.
Spicy Version: A pinch of cayenne pepper or shichimi togarashi in the egg mixture adds subtle heat that balances the sweetness. This is my personal favorite for weekend brunches.
Serving and Storage Tips
Tamagoyaki is incredibly versatile when it comes to serving temperature and timing.
Hot or Cold: You can serve tamagoyaki immediately while warm, at room temperature, or chilled from the refrigerator. Each temperature offers a different experience. Warm tamagoyaki has the most tender, yielding texture. Room temperature allows the flavors to meld and is traditional for bento boxes. Cold tamagoyaki becomes slightly firmer and makes an excellent protein-rich snack.
Serving Suggestions: Serve slices alongside steamed rice and miso soup for a classic Japanese breakfast. Add to bento boxes with rice, pickled vegetables, and grilled fish. Top with a small mound of grated daikon radish and a drop of soy sauce for a refreshing contrast. For sushi restaurants at home, serve as the final course of a sushi meal.
Storage: Refrigerate leftover tamagoyaki in an airtight container for up to 2 days. Do not freeze, as the texture becomes rubbery upon thawing. To reheat, warm gently in a covered pan over low heat or microwave for 15-20 seconds. Avoid overheating, which toughens the eggs.
Meal Prep: Make tamagoyaki the night before and refrigerate. The flavor actually improves as the layers meld together. Slice in the morning for an instant protein addition to breakfast or lunch boxes.
Frequently Asked Questions
What makes a good tamagoyaki?
A good tamagoyaki has a smooth, bubble-free texture, distinct even layers without gaps, and a balanced sweet-savory flavor. The exterior should be pale golden without browning, and the interior should be tender and moist rather than rubbery. Proper heat control and gentle rolling technique create these desirable qualities.
Should tamagoyaki be hot or cold?
Tamagoyaki can be enjoyed hot, room temperature, or cold depending on your preference and context. Warm tamagoyaki offers the most tender texture and is ideal for immediate serving. Room temperature is traditional for bento boxes and allows flavors to meld. Cold tamagoyaki makes an excellent protein snack and holds its shape well for slicing.
Is making tamagoyaki hard?
Tamagoyaki requires practice but is not difficult to learn. The first few attempts may look imperfect, but most home cooks achieve presentable results by their third or fourth try. The rolling technique becomes intuitive with repetition. Using a non-stick pan and controlling heat properly are more important than having expensive equipment.
Does tamagoyaki need mirin?
Mirin is traditional but not essential. It adds subtle sweetness and a slight sheen to the finished omelette. You can substitute with a tiny pinch of extra sugar and a drop of water, or use sake with a bit of sugar. Many simplified tamagoyaki recipes omit mirin entirely and still produce delicious results using just eggs, dashi, soy sauce, and sugar.
Can I make tamagoyaki without a rectangular pan?
Yes, you can make tamagoyaki in a standard round non-stick skillet. Use a 10-inch pan and fold the egg into thirds like a letter before rolling, rather than rolling straight across. The shape will be more cylindrical than rectangular, but the layered texture and flavor remain identical. Many Japanese home cooks use round pans successfully.
Conclusion
Now you know how to make tamagoyaki Japanese rolled omelette in your own kitchen. This technique takes practice, but the rewards are well worth the effort. A perfectly rolled tamagoyaki transforms simple eggs into something that feels special and tastes incredible.
Start with the basic recipe, master the rolling motion, then experiment with variations that suit your taste. Whether you enjoy it warm for Sunday brunch or pack it cold in weekday lunch boxes, tamagoyaki brings authentic Japanese flavor to your table. Your first attempt might not win beauty contests, but by your fifth try, you will produce omelettes that make you proud. Happy cooking!