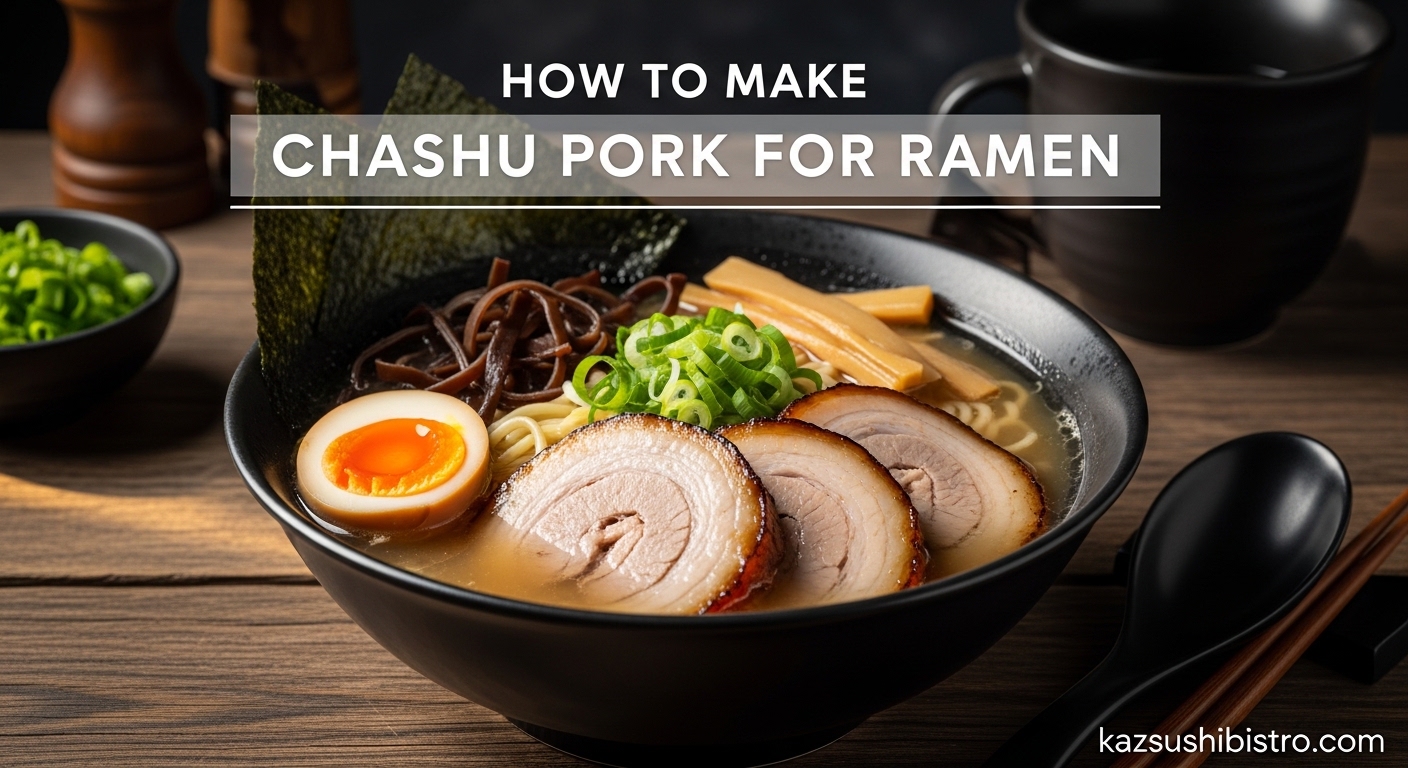
Have you ever wondered how ramen shops achieve that impossibly tender, flavor-packed pork that practically melts on your tongue? That is chashu, the crown jewel of any great bowl of ramen. Learning how to make chashu pork for ramen at home will transform your noodle soup from good to absolutely unforgettable.
At KAZ Sushi Bistro, we have spent years perfecting this technique. The good news? You do not need a commercial kitchen or years of training. With patience and the right method, anyone can create restaurant-quality chashu in their own kitchen.
This comprehensive guide walks you through everything from selecting the perfect pork belly to the overnight resting secrets that make all the difference. By the end, you will have the knowledge to make authentic Japanese chashu that rivals your favorite ramen shop.
Table of Contents
What is Chashu?
Chashu (チャーシュー) is Japanese braised pork belly that serves as the definitive ramen topping. Unlike its Chinese counterpart char siu, which is roasted and often sweet-glazed, Japanese chashu is slowly simmered in a soy sauce-based liquid until the meat becomes fork-tender.
The name derives from the Chinese “char siu” (叉燒), but the Japanese adaptation took on its own character. While Chinese char siu is typically boneless pork shoulder roasted with a sweet marinade, Japanese chashu uses pork belly and a braising technique that creates a completely different texture and flavor profile.
The Three Styles of Japanese Braised Pork 2026
Within Japanese cuisine, you will encounter three main variations. Chashu refers specifically to the rolled, braised pork belly used in ramen. Nibuta (煮豚) describes non-rolled pork belly braised in a similar liquid, often used for rice bowls. Yakibuta (焼豚) indicates pork that has been seared or torched after braising, adding a caramelized exterior.
Most ramen shops use the rolled technique because it creates that beautiful spiral pattern when sliced. The rolling also helps the pork retain moisture during the long cooking process.
Best Cut of Pork for Chashu
Pork belly is unequivocally the best cut for authentic chashu. The alternating layers of fat and meat create the signature texture that makes chashu so irresistible. When cooked low and slow, the fat renders into the meat while the collagen breaks down, resulting in a silky, melt-in-your-mouth experience.
What to Look For When Buying
Seek out skinless pork belly with even fat-to-meat distribution. The ideal piece is roughly rectangular, about 1.5 to 2 inches thick, with clearly defined layers. Avoid pieces that are mostly fat or mostly lean meat. The best chashu comes from balanced layering.
If possible, buy from a butcher rather than pre-packaged grocery store cuts. A good butcher can provide a fresh, even piece and may even remove the skin for you if needed. Asian markets are excellent sources for quality pork belly at reasonable prices.
Skin-On vs Skinless
We strongly recommend skinless pork belly for chashu. The skin becomes tough and rubbery during braising, creating an unpleasant texture. If your only option is skin-on, remove it yourself with a sharp knife before proceeding.
Alternative Cuts
While pork belly is traditional, you can make chashu-style pork using other cuts. Pork shoulder works well but requires longer cooking. Pork loin is too lean and will become dry. For a lighter option, chicken thighs can be prepared using the same braising liquid and technique, creating a delicious chicken chashu alternative.
Ingredients for Authentic Chashu
The beauty of chashu lies in its simplicity. You need just a handful of ingredients to create deep, complex flavor. Here is what you will need for approximately 1 kilogram (2.2 pounds) of pork belly, yielding 8 to 10 servings.
The Essential Ingredients
Pork: 1 kg (2.2 lbs) skinless pork belly block
Braising Liquid:
- 80 ml (1/3 cup) soy sauce
- 80 ml (1/3 cup) sake
- 80 ml (1/3 cup) mirin
- 2 tablespoons sugar (white or brown)
- 2 cups (480 ml) water
Aromatics:
- 3 cloves garlic, smashed
- 1 thumb-sized piece ginger, sliced
- 2 stalks green onions (scallions), cut into 3-inch pieces
For Cooking:
- 2 tablespoons neutral oil (vegetable or canola)
- Kitchen twine for tying
Understanding the Ingredients
Soy sauce provides the savory umami base. Regular Japanese soy sauce works perfectly. Sake adds depth and helps tenderize the meat through its amino acids. Mirin contributes sweetness and a subtle gloss to the finished chashu.
The sugar balances the saltiness and helps create that beautiful glaze. Some recipes call for rock sugar, but regular granulated sugar works fine. Garlic, ginger, and green onions infuse the braising liquid with aromatic complexity without overwhelming the pork.
About Mirin
Some experienced chashu makers avoid mirin, arguing that the alcohol can tighten proteins and affect texture. We find that a moderate amount adds desirable sweetness and sheen. If you prefer, you can substitute additional sake plus a touch more sugar.
Chashu Two Ways: Rolled vs Non-Rolled 2026
Before diving into the technique, you must choose your approach. Both methods produce delicious results, but they differ in appearance, texture, and cooking behavior.
| Feature | Rolled Chashu | Non-Rolled Chashu |
|---|---|---|
| Appearance | Beautiful spiral pattern when sliced | Clean layers visible in slices |
| Moisture Retention | Excellent – fat and juices stay trapped inside | Good, but slightly more moisture loss |
| Slicing | Round slices, perfect for ramen presentation | Rectangular or square slices |
| Cooking Time | 2.5 to 3 hours | 2 to 2.5 hours |
| Difficulty | Requires tying technique | Beginner-friendly |
| Best For | Ramen topping, visual appeal | Rice bowls, quick preparation |
Our recommendation? Learn the rolled method first. It is the traditional technique used in ramen shops, and the extra effort pays off in presentation and texture. Once comfortable, experiment with the non-rolled style for different applications.
How to Roll and Tie Pork Belly
The rolling and tying technique intimidates many first-time chashu makers. With practice, it becomes second nature. Here is our foolproof method.
Step-by-Step Rolling
Place your pork belly skin-side down on a cutting board with the short edge facing you. Starting from the edge closest to you, roll the meat tightly away from you, jelly-roll style. The fat should end up on the outside of the roll. A tight roll is crucial for even cooking and the characteristic spiral pattern.
Tying with Kitchen Twine
Cut five to six pieces of kitchen twine, each about 12 inches long. Slide the first piece of twine under the roll about 1 inch from the end. Tie it securely with a square knot, but not so tight that it cuts into the meat. Repeat every 1 to 1.5 inches along the length of the roll. Trim excess twine.
The twine serves two purposes. It holds the roll together during cooking, and it helps the pork maintain its shape for even slicing later. Do not skip this step, even if it feels fussy.
Practice Makes Perfect
If you are nervous about tying meat for the first time, practice with a tea towel rolled to pork belly size. This lets you perfect your technique without wasting ingredients. After one or two practice runs with the towel, the real thing will feel natural.
How to Make Chashu Pork for Ramen: Step-by-Step Instructions (July 2026)
Now comes the main event. Follow these steps carefully for perfect chashu every time. Total active time is about 45 minutes, but plan for 4 hours including resting.
Step 1: Prepare the Pork Belly
Remove the pork belly from the refrigerator 30 minutes before cooking. Room temperature meat sears more evenly. Pat the surface completely dry with paper towels. Moisture is the enemy of good browning.
If making rolled chashu, roll and tie the pork belly as described above. For non-rolled chashu, simply ensure you have a clean, rectangular block.
Step 2: Sear the Pork
Heat 2 tablespoons of neutral oil in a Dutch oven or heavy-bottomed pot over medium-high heat. When the oil shimmers, add the pork. Sear on all sides until deeply golden brown, about 3 to 4 minutes per side. Do not rush this step.
Searing creates the Maillard reaction, developing complex flavors that will infuse the entire dish. The browned bits left in the pot (fond) are flavor gold. Remove the seared pork and set aside on a plate.
Step 3: Sauté the Aromatics
In the same pot with the rendered pork fat, add the smashed garlic, sliced ginger, and green onion pieces. Sauté over medium heat for about 1 minute until fragrant. The aromatics will pick up all those delicious browned bits from the bottom of the pot.
Step 4: Add the Braising Liquid
Pour in the soy sauce, sake, mirin, and sugar. Add 2 cups of water and stir to combine. Bring the liquid to a boil, scraping up any remaining browned bits from the pot bottom with a wooden spoon.
Taste the liquid at this point. It should be savory-sweet with depth from the aromatics. Adjust with a touch more sugar if you prefer it sweeter, or more soy for saltiness.
Step 5: Braise the Pork
Return the seared pork to the pot. The liquid should come about halfway up the sides of the meat. If needed, add a splash more water. Bring the liquid back to a boil, then immediately reduce the heat to the lowest setting.
Cover with an otoshibuta (drop lid) if you have one. This traditional Japanese lid sits directly on the liquid surface, ensuring even heat distribution and preventing the braising liquid from reducing too quickly. If you do not have one, use a piece of parchment paper cut to fit, with a small hole in the center.
Simmer gently for 2 to 2.5 hours for non-rolled pork, or 2.5 to 3 hours for rolled chashu. Turn the meat every 30 minutes to ensure even cooking. The liquid should barely bubble. If it is boiling vigorously, reduce the heat.
Step 6: Test for Doneness
The chashu is done when a skewer or sharp knife passes through the center with slight resistance. The meat should feel tender but not mushy. If you are unsure, cut a small piece from the end and taste it.
Remember that the pork will continue cooking slightly from residual heat after you turn off the burner. Slight underdoneness is better than overdoneness at this stage.
Step 7: Cool and Rest Overnight
This step is non-negotiable for the best results. Remove the pot from heat and let the pork cool completely in the braising liquid, at least 1 hour at room temperature. The meat will reabsorb some of the liquid as it cools.
Transfer the pork and braising liquid to a container. Refrigerate overnight, or for at least 8 hours. This resting period firms up the fat, making the chashu much easier to slice cleanly. It also allows the flavors to fully develop and meld.
Step 8: Slice and Serve
Remove the chashu from the refrigerator. Remove and discard the kitchen twine if using rolled chashu. Using a sharp chef’s knife or slicing knife, cut into 1/4-inch thick rounds for rolled chashu, or slices of your preferred thickness for non-rolled.
For ramen, place 2 to 3 slices atop your assembled bowl. For an extra-special presentation, use a kitchen torch to char the surface lightly (aburi style) before serving. The slight caramelization adds wonderful depth.
Tips for Perfect Chashu Every Time
After years of making chashu in our kitchen, we have learned a few secrets that make the difference between good and extraordinary results.
The Six Keys to Success
1. Do not skip the sear. Those 15 minutes of browning create flavor compounds that cannot be replicated any other way. The fond in the pot is the foundation of your braising liquid.
2. Keep the heat low. Gentle simmering breaks down collagen without tightening muscle fibers. A violent boil will yield tough, dry meat. If you see rapid bubbling, turn down the heat.
3. Use an otoshibuta. This simple tool makes a remarkable difference. It keeps the pork submerged, prevents the surface from drying out, and helps the liquid circulate. Make one from parchment paper if needed.
4. Turn the meat regularly. Every 30 minutes, gently rotate the pork to ensure even exposure to the braising liquid. This prevents one side from becoming oversaturated while another dries out.
5. The overnight rest is sacred. We cannot emphasize this enough. Chashu sliced immediately after cooking will fall apart and lose moisture. The overnight refrigeration firms the meat and allows complete flavor absorption.
6. Save every drop of braising liquid. This concentrated flavor gold makes an incredible sauce for rice, noodles, or vegetables. Strain and refrigerate it along with the pork.
How to Tell When Chashu is Done
Without a thermometer, use the skewer test. Insert a thin metal skewer into the center of the meat. It should slide in with minimal resistance, but you should still feel some texture. If it slides through like butter, you may have cooked it slightly too long. If you meet significant resistance, continue cooking for another 30 minutes.
Troubleshooting Common Chashu Mistakes
Even experienced cooks encounter issues. Here is how to fix the most common problems.
My Chashu is Tough
Undercooking is the usual culprit. The collagen in pork belly needs extended time at low temperature to convert to gelatin. Return the meat to the braising liquid and continue cooking for another 30 to 60 minutes. Even properly cooked chashu can seem tough when hot. The overnight refrigeration step is essential for the proper texture.
My Chashu Fell Apart When Slicing
This usually means one of two things. Either the pork was overcooked, or it was sliced while still warm. Chashu must be thoroughly chilled before slicing. If it is still falling apart after chilling, reduce cooking time by 30 minutes next attempt.
My Chashu is Too Salty
The braising liquid concentrates as it cooks. If your finished chashu tastes too salty, dilute the braising liquid with additional water during the cooking process. Next time, reduce the soy sauce slightly or use low-sodium soy sauce.
My Chashu is Bland
Bland chashu usually results from insufficient searing or under-seasoned braising liquid. Make sure to develop a deep brown crust during the sear phase. Taste your braising liquid before adding the pork and adjust seasoning. You can also reduce some braising liquid into a glaze for serving.
The Braising Liquid Reduced Too Much
If the liquid level drops below one-third of the pork depth, add hot water to bring it back up. Check your heat level. It should be the gentlest simmer possible, with just occasional small bubbles breaking the surface.
Alternative Cooking Methods
While stovetop braising produces the most traditional results, modern appliances offer convenient alternatives.
Pressure Cooker or Instant Pot Method
For weeknight chashu, the pressure cooker is a game-changer. Sear the pork using the sauté function, then add all braising liquid ingredients. Cook on high pressure for 35 minutes for rolled pork, or 30 minutes for non-rolled. Allow natural pressure release for 15 minutes, then quick release remaining pressure.
The texture will be slightly different from traditional braising, more tender than sliceable. Chill thoroughly before attempting to slice. This method is perfect when time is short.
Sous Vide Technique
For precise control, sous vide produces exceptional chashu. Sear the pork first, then place in a bag with all braising liquid ingredients. Cook at 77°C (170°F) for 12 hours. The result is incredibly tender with perfect moisture retention.
Finish by reducing the bag liquids into a glaze, or torch the pork surface for aburi-style presentation. This method requires planning but yields consistent, restaurant-quality results.
Oven Braising
Preheat your oven to 150°C (300°F). After searing the pork and building your braising liquid on the stovetop, cover the pot and transfer to the oven. Braise for 3 to 3.5 hours, turning once halfway through.
Oven braising provides very even heat and reduces the risk of scorching. It is an excellent option if your stovetop runs hot or uneven.
Storage and Reheating
One of chashu’s greatest strengths is its suitability for meal prep. Properly stored, it keeps beautifully and often tastes better the next day.
Refrigerator Storage
Store chashu submerged in its braising liquid in an airtight container. It will keep for up to 5 days in the refrigerator. The liquid protects the meat and prevents drying.
Freezer Storage
For longer storage, freeze slices individually on a parchment-lined tray, then transfer to a freezer bag once solid. This prevents slices from freezing together. Frozen chashu keeps for up to 3 months. You can also freeze the entire roll wrapped tightly in plastic wrap and foil.
Three Ways to Reheat
Method 1: In the Braising Liquid Gently warm slices in a small pot with some reserved braising liquid over low heat for 3 to 5 minutes. This is the most flavorful method.
Method 2: Microwave Place slices on a microwave-safe plate with a damp paper towel over them. Heat in 20-second intervals until just warm. Avoid overheating, which toughens the meat.
Method 3: Torch (Aburi Style) For the ultimate ramen shop experience, use a kitchen torch to char the surface of cold chashu directly. The contrast between the warm, caramelized exterior and cool center is sublime.
Serving Suggestions Beyond Ramen
While ramen is the classic destination for chashu, this versatile protein shines in many applications.
Chashu Don (Chashu Rice Bowl)
Layer warm rice in a bowl, top with sliced chashu, and drizzle with reduced braising liquid. Add a soft-boiled ramen egg and sliced green onions. This simple bowl rivals any restaurant donburi.
Fried Rice (Yakimeshi)
Dice chashu into small cubes and crisp them in a hot pan before adding to fried rice. The rendered fat adds incredible flavor to the rice. This is the perfect use for end pieces that are not pretty enough for slicing.
Steam Buns (Nikuman)
Chopped chashu makes a spectacular filling for homemade or store-bought bao. Mix with a little hoisin sauce and green onions for an easy, impressive appetizer.
Hiyashi Chuka (Cold Ramen)
Sliced chashu is the traditional protein topping for this refreshing summer dish of chilled noodles with vegetables and tangy dressing.
Using Leftover Braising Liquid
Do not discard that flavor-packed liquid. Strain it and use as a soup base, simmer sauce for vegetables, or glaze for grilled meats. It makes an incredible addition to fried rice or noodle dishes. Store it separately and use within a week, or freeze in ice cube trays for convenient portions.
Frequently Asked Questions
How to make chashu pork for ramen at home?
Roll and tie pork belly into a cylinder. Sear all sides until golden brown. Simmer in a mixture of soy sauce, sake, mirin, sugar, and aromatics for 2-3 hours until tender. Cool completely and refrigerate overnight before slicing into rounds for serving.
What cut of pork is used for chashu?
Pork belly is the traditional and ideal cut for chashu. Its alternating layers of fat and meat create the signature melt-in-your-mouth texture when braised. Look for skinless pork belly about 1.5-2 inches thick with even fat-to-meat distribution.
What is the secret to tender chashu?
The secret is low and slow cooking to break down collagen into gelatin, combined with an overnight rest in the refrigerator. The resting period firms the meat for clean slicing while allowing it to reabsorb moisture and develop deeper flavor.
Can you overcook chashu?
Yes, though chashu is forgiving. Cooking beyond 3-4 hours can make the meat mushy and cause it to lose structural integrity. The pork is properly cooked when a skewer passes through with slight resistance, not falling apart.
How does chashu get so tender?
The low-temperature braising breaks down collagen in the connective tissue, converting it to silky gelatin. The fat layers render slowly, basting the meat from within. This collagen breakdown is what creates chashu’s characteristic tender texture.
What does chashu mean in Japanese?
Chashu (チャーシュー) derives from the Chinese char siu (叉燒). While Chinese char siu is roasted pork shoulder with a sweet glaze, Japanese chashu refers to braised pork belly simmered in soy sauce-based liquid until tender.
Do you need to marinate chashu before cooking?
No, marinating is unnecessary. The long braising process infuses the pork with plenty of flavor. Searing before braising develops the flavor base. The overnight rest in the braising liquid further enhances taste without requiring a separate marinade step.
How long does chashu last in the refrigerator?
Properly stored submerged in braising liquid, chashu lasts up to 5 days in the refrigerator. For longer storage, freeze individual slices for up to 3 months. Always keep the meat covered in liquid to prevent drying.
Conclusion
Learning how to make chashu pork for ramen opens up a world of culinary possibilities. This single technique transforms humble pork belly into something truly extraordinary. The investment of time pays dividends in flavor, texture, and the satisfaction of creating restaurant-quality food at home.
Remember the fundamentals: quality pork, a proper sear, low and slow braising, and the crucial overnight rest. Master these elements, and you will produce chashu that rivals the best ramen shops.
We encourage you to try this recipe and make it your own. Experiment with the braising liquid ratios to suit your taste. Try both rolled and non-rolled methods. Use your chashu not just for ramen, but for rice bowls, fried rice, and creative applications we have not even imagined yet.
The beauty of cooking lies in the journey. Your first chashu might not be perfect, but it will be delicious. Each batch will teach you something new. Soon, you will have your own tips and tricks to share.
Now gather your ingredients, clear your schedule, and prepare to make the best chashu of your life. Your homemade ramen is about to reach a whole new level.
Recipe Summary
Prep Time: 30 minutes
Cook Time: 2 hours 30 minutes
Resting Time: 8 hours (overnight)
Total Time: 11 hours
Servings: 8-10
Difficulty: Intermediate