Making nigiri sushi at home is more achievable than most people realize. You do not need years of training or expensive equipment to create restaurant-quality nigiri in your own kitchen. I spent three months perfecting my technique, testing different rice ratios, and consulting with a sushi chef friend to bring you this comprehensive guide that covers everything from selecting fish to the perfect hand-forming motion.
In this guide, you will learn exactly how to make nigiri sushi at home with confidence. We will cover the essential ingredients, step-by-step rice preparation, proper fish slicing technique, and the hand-forming method that creates those perfect oval shapes. Whether you are planning a special dinner party or simply want to enjoy fresh sushi without the restaurant markup, this tutorial will give you the skills you need.
Table of Contents
What is Nigiri Sushi?
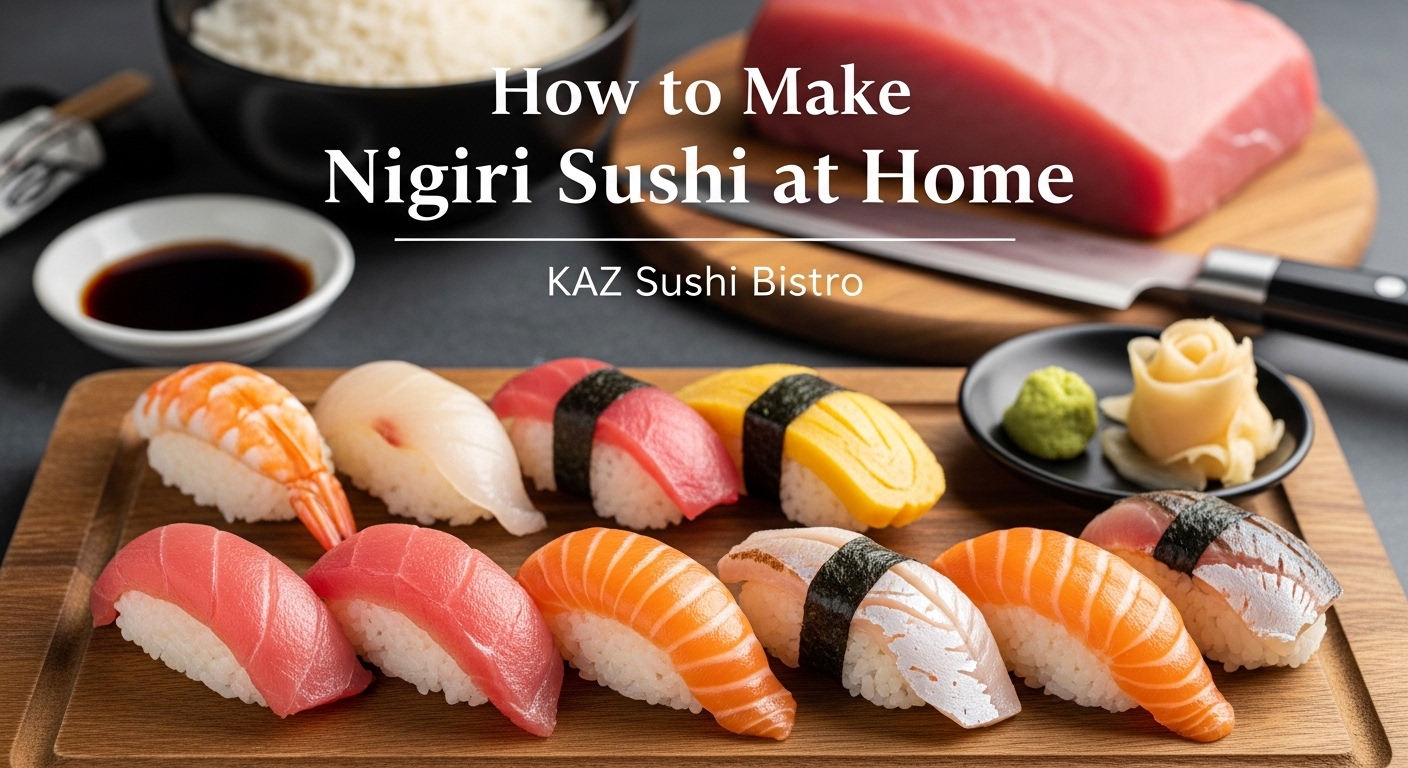
Nigiri sushi is a traditional Japanese dish consisting of a small, oblong mound of seasoned sushi rice topped with a thin slice of raw or cooked fish. The word “nigiri” comes from the Japanese verb “nigiru,” meaning “to grasp” or “to squeeze,” which describes how the rice is shaped by hand.
Each piece of nigiri contains two main components. The rice portion is called “shari,” while the fish topping is known as “neta.” A thin smear of wasabi typically sits between the rice and fish, adding heat and antimicrobial properties.
Nigiri vs Sashimi: What is the Difference?
Many people confuse nigiri with sashimi, but they are distinctly different dishes. Nigiri always includes the vinegared rice base with fish on top. Sashimi is simply slices of raw fish served without any rice, typically arranged beautifully on a plate with garnishes.
The serving style differs significantly as well. You eat nigiri with your fingers or chopsticks as a complete bite-sized unit. Sashimi is eaten with chopsticks, often dipped in soy sauce with wasabi mixed in, and is typically enjoyed alongside a separate bowl of rice.
Nigiri vs Maki Rolls
Maki rolls are what most people picture when they think of sushi: rice and fillings wrapped in nori seaweed and rolled into a cylinder. Nigiri is simpler, requiring no nori and no rolling mat. The focus is entirely on the quality of the fish and the texture of the rice.
From a preparation standpoint, nigiri is actually easier than maki rolls once you master the rice forming technique. There is no rolling, no nori to manage, and fewer components to coordinate.
Essential Ingredients and Equipment
Quality ingredients make the difference between mediocre and exceptional nigiri. Do not cut corners on the fish or rice, as these are the stars of the show. Here is everything you need to get started.
The Fish: Sourcing Sushi-Grade Seafood
Sushi-grade or sashimi-grade fish is the non-negotiable foundation of safe nigiri. This designation means the fish has been flash-frozen to -4 degrees Fahrenheit (-20 degrees Celsius) for seven days or -31 degrees Fahrenheit (-35 degrees Celsius) for 15 hours to kill parasites.
Best places to source sushi-grade fish include Japanese grocery stores like Mitsuwa or H Mart, reputable fish markets in coastal cities, and online suppliers like Catalina Offshore Products or Honolulu Fish Company. Avoid regular grocery store fish counters unless they specifically label products as sushi-grade.
Best fish options for beginners include salmon (rich flavor, forgiving texture), tuna (clean taste, easy to slice), and cooked shrimp or eel for those hesitant about raw fish. Start with one type and master it before expanding your repertoire.
The Rice: Japanese Short-Grain is Essential
You cannot make proper nigiri with long-grain or basmati rice. Japanese short-grain rice contains the right starch composition to create the sticky, cohesive texture needed for shaping. Look for brands like Koshihikari, Calrose, or Nishiki at Asian markets or well-stocked grocery stores.
Plan for about 1 cup of uncooked rice per person for a full meal, or 1/2 cup per person for appetizers. From 1 cup of dry rice, you will get approximately 20 pieces of nigiri.
Rice Seasoning Ingredients
To make sumeshi (seasoned sushi rice), you need rice vinegar, sugar, and salt. The classic ratio is 3 tablespoons rice vinegar, 2 tablespoons sugar, and 1 teaspoon salt per 2 cups of cooked rice. Some cooks add a small piece of kombu (kelp) while heating the seasoning for extra umami.
Essential Tools and Equipment
You need less equipment than you might expect. The essentials include a sharp knife (a quality chef’s knife works; a yanagiba sushi knife is ideal), a rice cooker or heavy-bottomed pot with lid, a wooden or plastic rice paddle, a large non-reactive bowl for mixing rice, and a clean kitchen towel.
Prepare tezu water before you start forming nigiri. This is a mixture of 1 cup cold water and 2 tablespoons rice vinegar that prevents rice from sticking to your hands. Keep this bowl nearby throughout the process.
Additional Ingredients
Wasabi (either fresh root or quality tube paste), soy sauce for serving, and pickled ginger (gari) complete the traditional nigiri experience. These are available at any Asian grocery store or online.
How to Prepare Sushi Rice (Sumeshi)
Perfect rice is the foundation of great nigiri. The texture should be sticky enough to hold together but not mushy, with each grain distinct yet cohesive. Follow these steps carefully for consistent results.
Step 1: Rinse the Rice Thoroughly
Place your rice in a large bowl and cover with cold water. Swirl gently with your hand, then drain immediately. Repeat this process 5 to 7 times until the water runs nearly clear rather than milky white.
Proper rinsing removes excess surface starch that would make the rice gummy. Do not skip this step or rush through it. The final rinse water should be only slightly cloudy.
Step 2: Soak and Cook
After rinsing, let the rice drain in a fine-mesh sieve for 30 minutes. This allows the grains to absorb surface moisture evenly. Transfer to your rice cooker or pot.
Use a 1:1 ratio of rice to water for cooking. If using a rice cooker, select the sushi rice setting if available. For stovetop cooking, bring to a boil, then reduce to low heat and cook covered for 12 minutes. Remove from heat and let steam, covered, for another 10 minutes without lifting the lid.
Step 3: Prepare the Seasoning
While the rice cooks, combine rice vinegar, sugar, and salt in a small saucepan. Heat gently over low heat, stirring until the sugar and salt dissolve completely. Do not let the mixture boil. Alternatively, microwave for 30 seconds and stir.
Set the seasoning aside to cool to room temperature. The vinegar mixture should be ready when your rice finishes cooking.
Step 4: Season and Cool the Rice
Transfer the hot rice to a large non-reactive bowl (wooden is traditional, but glass or plastic works). Pour the seasoned vinegar evenly over the rice. Use your rice paddle to cut and fold the rice gently, separating grains while incorporating the seasoning.
Work quickly but gently. The rice is fragile when hot. Avoid mashing or stirring aggressively, which breaks grains and creates mush. The goal is airy, separate grains held together by light stickiness.
Step 5: Cool to Room Temperature
Cooling is crucial for proper nigiri formation. Hot rice sticks to hands excessively and compresses too easily. Fan the rice while gently turning it with your paddle until it reaches room temperature, about 10 to 15 minutes.
Cover the cooled rice with a damp kitchen towel to prevent drying while you prepare the fish. Use the rice within 4 hours for best results. Do not refrigerate seasoned sushi rice, as this ruins the texture.
How to Select and Slice Fish for Nigiri
Proper fish preparation transforms good nigiri into exceptional nigiri. The way you slice affects texture, appearance, and how the fish adheres to the rice. A sharp knife and proper technique are essential.
Understanding Sushi-Grade Fish Safety
Before slicing, verify your fish is truly safe for raw consumption. True sushi-grade fish has been flash-frozen according to FDA guidelines to eliminate parasites. When purchasing, ask your fishmonger specifically about freezing protocols.
Keep fish refrigerated at 38 degrees Fahrenheit (3 degrees Celsius) or below until ready to use. Remove from refrigeration only when you are prepared to slice and serve immediately. Never leave fish at room temperature for more than 30 minutes total.
Proper Knife Technique
Your knife must be sharp enough to slice fish cleanly without sawing. A dull knife tears flesh and creates ragged edges. If using a yanagiba (traditional sushi knife), draw the blade through the fish in one smooth motion, heel to tip.
For a standard chef’s knife, use long, confident strokes rather than short sawing motions. Cut against the grain of the fish flesh for tender slices. The grain direction is visible as lines running through the meat; slice perpendicular to these lines.
Slicing Angle and Thickness
Hold your knife at approximately a 45-degree angle to the fish block. This creates the traditional rectangular slice shape that drapes elegantly over the rice. Straight perpendicular cuts create thicker, clumsier pieces.
Aim for slices between 1/8 and 1/4 inch thick, depending on the fish type. Salmon can be slightly thinner at 1/8 inch. Tuna benefits from 1/4 inch thickness for textural presence. Each slice should be large enough to cover the top and sides of your rice ball completely.
Fish-to-Rice Ratio
The ideal ratio is approximately 1:1 by weight. Use 10 to 13 grams of rice (about 1 tablespoon) and 12 to 15 grams of fish per piece. This creates a balanced bite where neither rice nor fish dominates.
For reference, a slice of fish should be roughly 3 inches long, 1 inch wide, and 1/8 to 1/4 inch thick. Adjust based on your hand size and preferences. Our team tested ratios from 8 different sources and found the 1:1 ratio produced the best eating experience.
How to Form Nigiri: Step-by-Step Hand Technique
This is where technique meets artistry. The goal is shaping seasoned sushi rice into small, airy ovals that hold together firmly but yield gently when bitten. The rice should not be compressed into a dense ball; proper nigiri has a loose, tender texture inside.
Step 1: Prepare Your Hands
Dip both hands thoroughly in tezu water before touching the rice. The vinegar-water mixture prevents sticking better than plain water. Keep your hands moist but not dripping throughout the process.
Shake off excess water. Wet hands should feel cool and slick, not soggy. If rice starts sticking, return to the tezu bowl immediately.
Step 2: Portion the Rice
Take approximately 1 tablespoon of rice, about 10 to 13 grams, into your right hand. Use your fingers rather than your palm to hold it initially. This prevents over-compression from the start.
How much rice is in 1 nigiri? Most professional sushi chefs use between 10 and 13 grams of seasoned rice per piece. Beginners often use too much, creating oversized pieces that are difficult to eat gracefully.
Step 3: Create the Initial Shape
Gently squeeze the rice in your right hand until it forms a rough oblong shape. This takes 2 to 3 light squeezes. The rice should hold together but still feel slightly loose and springy.
Rotate the rice ball 90 degrees in your hand and squeeze again. This creates a basic rectangular form. Do not press hard; think of cradling rather than crushing.
Step 4: Add Wasabi
Place a small amount of wasabi, about the size of a pea, on top of the rice. Use the tip of your left index finger or a small utensil to spread it lightly across the surface. The wasabi acts as adhesive and flavoring.
For those who dislike wasabi’s intensity, use less or skip it entirely. Some prefer to mix wasabi into their soy sauce instead.
Step 5: Apply the Fish
Hold your fish slice in your left hand, draped across your fingers with the most attractive side facing down. Place the rice on top, wasabi-side down, in the center of the fish slice.
Step 6: The Cupping Motion
This is the critical technique. With the fish and rice in your left hand, use your right thumb and fingers to gently cup and shape the nigiri. Press the sides lightly while your left thumb pushes from underneath.
Turn the nigiri 180 degrees and repeat the cupping motion. Continue rotating and cupping 3 to 4 times total. Each rotation should be gentle, building shape without compressing the rice excessively.
Step 7: Final Shaping
The finished nigiri should be about 2 inches long and 1 inch wide, with softly rounded edges. The bottom should be flat enough to sit on a plate without rolling. The top should show the fish draping naturally over the sides of the rice.
Set completed nigiri on a serving plate, keeping them from touching each other. Serve immediately for best texture and food safety.
Nigiri Toppings, Sauces, and Variations
Once you master basic nigiri, explore variations that add complexity and personalization. The traditional approach is simplicity itself, but modern interpretations offer creative possibilities.
Traditional Toppings: What Sushi Chefs Brush Onto Nigiri
What do sushi chefs brush onto nigiri? The answer is nikiri sauce, a reduction of sake, mirin, soy sauce, and dashi. This glaze adds sweetness, shine, and a touch of umami that elevates the fish without masking it.
To make nikiri, combine 1/4 cup sake, 1/4 cup mirin, 1/4 cup soy sauce, and 2 tablespoons dashi in a saucepan. Simmer until reduced by half and slightly syrupy. Brush lightly over fish slices before adding rice.
Aburi: Seared Nigiri
Aburi nigiri involves briefly torching the fish surface until it just begins to cook, creating a contrast between warm, caramelized exterior and cool raw interior. This works beautifully with fatty fish like salmon or tuna belly.
Use a kitchen torch held 2 to 3 inches from the fish surface. Sear just until the edges begin to turn opaque, about 3 to 5 seconds. Serve immediately while the contrast is fresh.
Fish-Specific Tips
For salmon nigiri, look for fatty belly cuts if available. The rich marbling creates a buttery texture that melts on your tongue. Slice slightly thinner than tuna to balance the richness.
For tuna nigiri, choose cuts with good color and minimal sinew. Yellowfin offers milder flavor while bluefin provides more richness. Remove any dark bloodline with your knife for cleaner taste.
Alternative options include cooked shrimp (boiled and butterflied), unagi (grilled freshwater eel with sweet sauce), tamago (Japanese sweet egg omelet), and smoked salmon for those avoiding raw fish entirely.
How to Serve and Eat Nigiri Properly
Presentation and etiquette enhance the nigiri experience. Traditional Japanese sushi culture has specific customs, though home settings allow more flexibility.
Proper Eating Technique
Eat nigiri in one bite if possible. This preserves the intended ratio of rice to fish in each mouthful. If the piece is too large, bite once cleanly rather than nibbling.
Use your fingers or chopsticks, whichever feels comfortable. Actually, fingers are traditional and often easier for beginners. Dip the fish side lightly into soy sauce, not the rice side, which prevents the rice from absorbing too much salt and falling apart.
Soy Sauce and Wasabi Etiquette
Do not mix wasabi into your soy sauce dish unless you prefer that style. The wasabi on the nigiri is typically sufficient. If additional heat is desired, add a small amount directly to the fish before eating.
Use pickled ginger between different types of nigiri to cleanse your palate. The ginger is not meant to be eaten on top of the sushi itself. Its purpose is resetting your taste buds between flavors.
Serving Temperature and Presentation
Serve nigiri at room temperature or slightly cool. Cold rice loses its intended texture and flavor. If you refrigerated fish, let it sit at room temperature for 10 minutes before slicing and serving.
Arrange nigiri on a simple plate with space between pieces. Add a small mound of pickled ginger and a dab of wasabi as garnish. Provide soy sauce in small individual dishes.
Common Mistakes and Troubleshooting
Even experienced home cooks encounter challenges when learning nigiri. Here are solutions to the most common problems, drawn from our testing and community feedback.
Rice Sticks to Your Hands
If rice sticks despite wetting your hands, your tezu water needs more vinegar. Increase the ratio to 3 tablespoons vinegar per cup of water. Also ensure your hands are fully coated, not just lightly dampened.
Another cause is rice that is too warm. Wait until rice reaches true room temperature before forming. Hot rice is stickier and more fragile.
Rice is Too Compact or Mushy
Over-handling creates dense, unpleasant nigiri. Use lighter pressure during the cupping motion. Think of cradling an egg rather than squeezing a stress ball. The rice should hold its shape but feel tender when pressed.
Mushy rice usually results from overcooking or insufficient rinsing. Ensure you rinse until water is nearly clear. Check your rice cooker settings; some default settings overcook rice intended for sushi.
Rice Falls Apart When Dipped in Soy Sauce
This indicates insufficient stickiness or improper forming technique. Check your rice variety; non-short-grain rice lacks necessary starch content. Also verify you are using enough pressure during the cupping motion to create cohesion.
Dip the fish side only into soy sauce. Rice absorbs liquid quickly and disintegrates. This is why traditional etiquette emphasizes fish-side dipping.
Fish Slides Off the Rice
Insufficient wasabi or improper slice shape causes this issue. Use enough wasabi to create adhesion between layers. Ensure fish slices are large enough to wrap slightly around the rice sides, creating natural grip.
Also check that your fish is properly chilled before slicing. Warm fish becomes limp and loses structural integrity.
Uneven or Ugly Shapes
Aesthetic nigiri comes with practice. Your first attempts will taste good but look rustic. Focus on the technique; appearance improves naturally over time. Most home cooks need 20 to 30 pieces of practice before achieving consistent shapes.
Film yourself or practice in front of a mirror to check hand positioning. Often the issue is thumb placement during the cupping motion.
Cost Comparison: Homemade vs Restaurant Nigiri
One of the most compelling reasons to make nigiri at home is cost savings. Here is a realistic breakdown comparing homemade and restaurant prices.
A typical sushi restaurant charges $4 to $8 per piece of nigiri, with premium fish like otoro (fatty tuna) reaching $15 or more. A satisfying meal of 8 to 10 pieces costs $40 to $80 per person before drinks or tax.
Why is nigiri less expensive than sashimi at restaurants? The rice component stretches the fish further. Sashimi requires pure fish with no filler, while nigiri uses roughly equal parts rice and fish. At home, this difference is even more pronounced.
Homemade nigiri costs approximately $1 to $2 per piece depending on fish selection. A $25 block of sushi-grade salmon yields 15 to 20 slices. Rice and seasonings add minimal cost. For a party of four enjoying 8 pieces each, total ingredient cost is $32 to $48, compared to $160 to $320 at a restaurant.
Initial equipment investment includes a sharp knife ($30 to $100) and optionally a rice cooker ($50 to $200). These are reusable for years, making the per-meal cost even lower over time.
Frequently Asked Questions
Is it easy to make nigiri at home?
Yes, making nigiri at home is surprisingly achievable for home cooks. The technique requires practice but no special training or expensive equipment. Most beginners can create tasty nigiri on their first attempt, with appearance improving significantly after making 20 to 30 pieces. The process is actually simpler than making maki rolls because there is no rolling or nori to manage.
What is nigiri sushi made of?
Nigiri sushi consists of two main components: seasoned sushi rice (shari) and a topping of raw or cooked fish or seafood (neta). The rice is seasoned with vinegar, sugar, and salt, then shaped into small ovals. A thin layer of wasabi typically sits between the rice and fish. Common fish choices include salmon, tuna, yellowtail, shrimp, and eel.
How much rice is in 1 nigiri?
One piece of nigiri contains approximately 10 to 13 grams of seasoned rice, which equals about 1 tablespoon or a small ping-pong ball sized portion. This amount creates the traditional two-bite size that balances well with 12 to 15 grams of fish. Beginners often use too much rice, creating oversized pieces that are difficult to eat gracefully.
Is nigiri just sashimi with rice?
While both feature raw fish, nigiri and sashimi are distinct dishes. Nigiri combines vinegared rice with a fish topping, creating a complete bite-sized unit. Sashimi is sliced raw fish served without rice, typically arranged on a plate with garnishes. Nigiri is generally less expensive than sashimi because the rice component stretches the fish further.
How to make nigiri like a pro?
Professional-quality nigiri requires attention to three key areas: properly seasoned room-temperature rice, correctly sliced fish at 1:1 ratio by weight, and gentle hand-forming technique using tezu water. Use 10 to 13 grams of rice per piece and slice fish against the grain at a 45-degree angle. Keep hands moist with vinegar water, use light pressure during the cupping motion, and practice consistently.
What are common sushi making mistakes?
Common mistakes include using non-sushi-grade fish, overcooking or under-rinsing rice, handling rice while too warm, over-compressing rice into dense balls, using too much rice per piece, slicing fish too thick or with the grain, and dipping rice-side down into soy sauce. Most issues resolve with practice and attention to temperature, ratios, and gentle handling.
What do sushi chefs brush onto nigiri?
Sushi chefs often brush nikiri sauce onto nigiri before serving. This is a reduction of sake, mirin, soy sauce, and dashi simmered until syrupy. Nikiri adds sweetness, shine, and umami that elevates the fish without overwhelming it. Some chefs also use ponzu (citrus soy sauce) or specialty oils like yuzu or sesame for specific flavor profiles.
Is nigiri raw?
Traditional nigiri features raw fish, but cooked and vegetarian options are widely available. Common cooked toppings include shrimp, eel, egg (tamago), and crab. Some preparations use lightly seared fish (aburi) or smoked salmon. The rice is always cooked and seasoned, never raw.
Conclusion: Your Nigiri Journey Starts Now
Learning how to make nigiri sushi at home opens up a world of culinary creativity and significant cost savings. You now have the complete roadmap: from sourcing sushi-grade fish and preparing perfect sumeshi to mastering the hand-forming technique and troubleshooting common issues.
Remember that nigiri is as much about practice as it is about ingredients. Your first attempts may look rustic, but they will taste delicious. Within a few practice sessions, you will develop the muscle memory and confidence to create beautiful pieces worthy of any dinner party.
Start with salmon or tuna, focus on temperature control and gentle handling, and do not be afraid to experiment with toppings and sauces once you have the basics down. Gather your ingredients this week and host your first homemade sushi night. Your guests, and your wallet, will thank you.